
This article is a written account of a video from the Lens Of James YouTube channel. Watch the video above and subscribe if you like what you see!
This article contains affiliate links to relevant products I have used in my videos. By buying through these links, I receive a small percentage of the sale at no cost to you which helps me support and grow my website and YouTube channel, so I can create more content like this in the future. Thank you for your support.
New cars are packed with tech these days, but it comes at a price. If, like me, you’ve got a slightly older vehicle which doesn’t have a touchscreen display with Apple Car Play or Android Auto, then you might be interested in this aftermarket upgrade which won’t come at the cost of a new car.

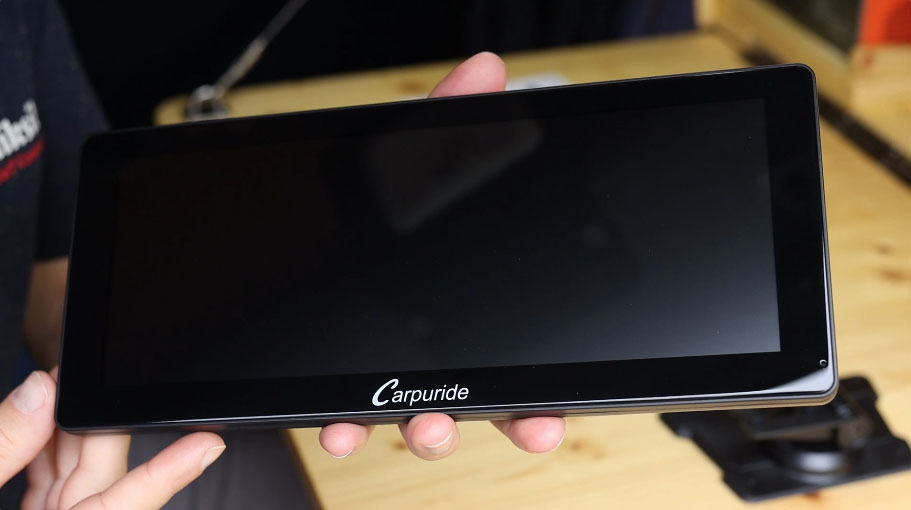
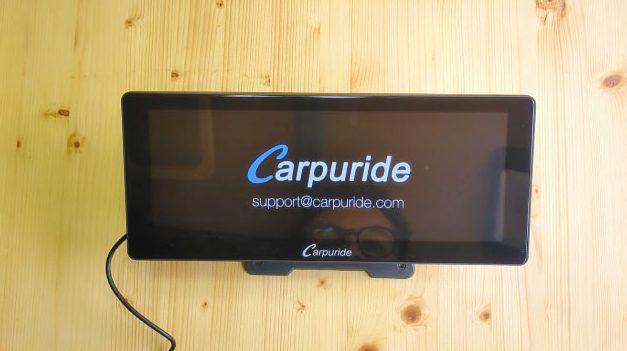
This is the Carpuride W103 PRO and it’s one of a range of their portable dashboard consoles that you can install in pretty much any vehicle, without removing head units or dealing with wiring.
First I’m going to show you what you get in the box, and then run through all the features and everything you need to know about this particular model.
Unboxing the W103 Pro
So let’s get into it, and the first thing you’ll notice is the screen unit, and it’s quite a sleek design but it still offers a sizeable 10.3 inches, which is great for not blocking too much of the windscreen. There are larger screens available too, and you can click any of the links in this article to find out more, plus use the Carpuride discount code LENSOFJAMES to get 15% off your next purchase from the Carpuride website.

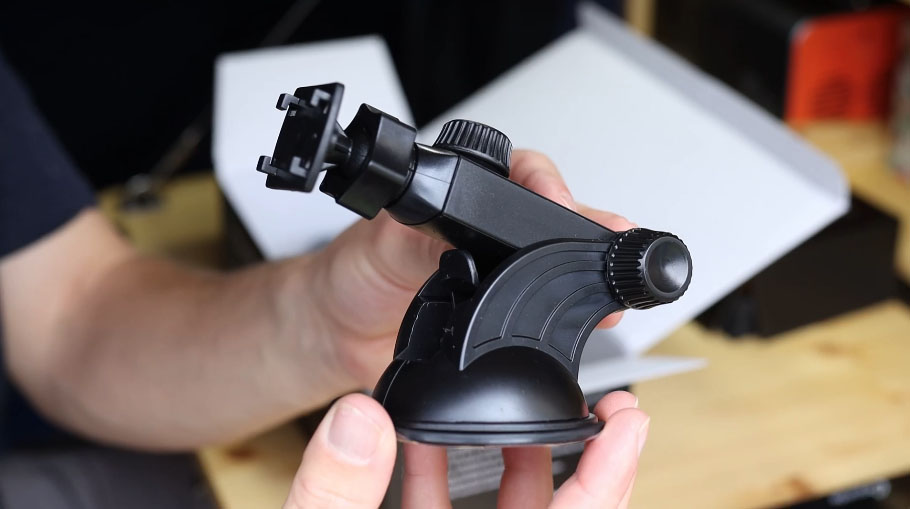
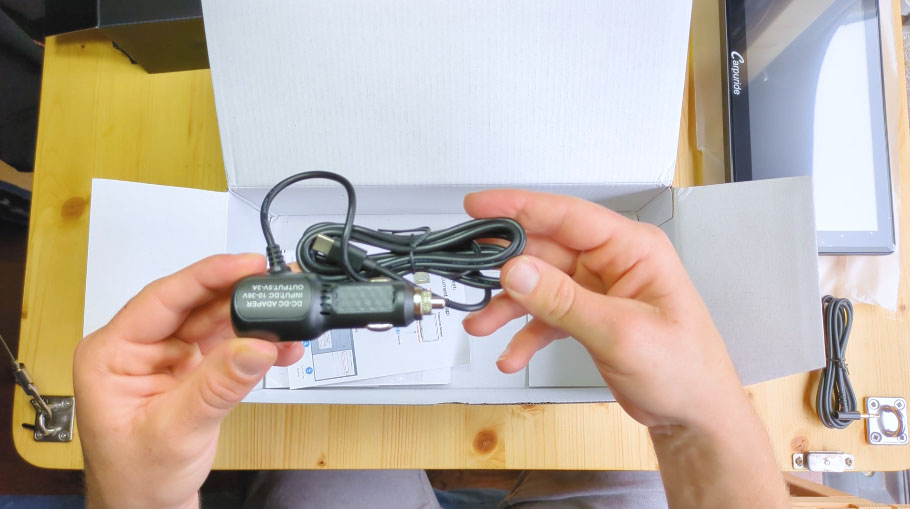
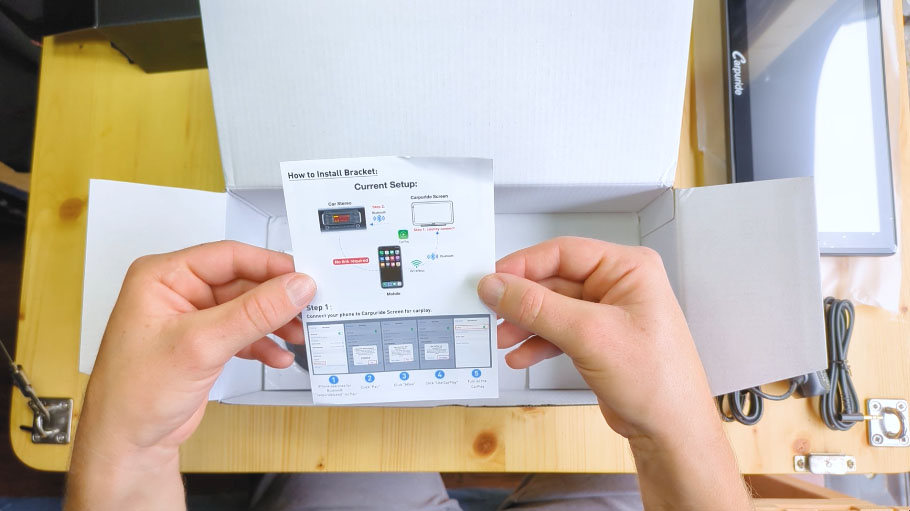
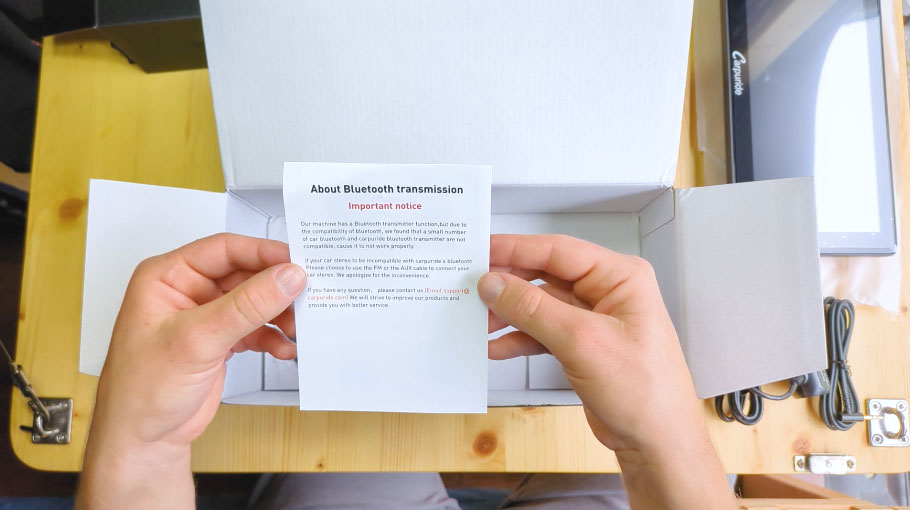
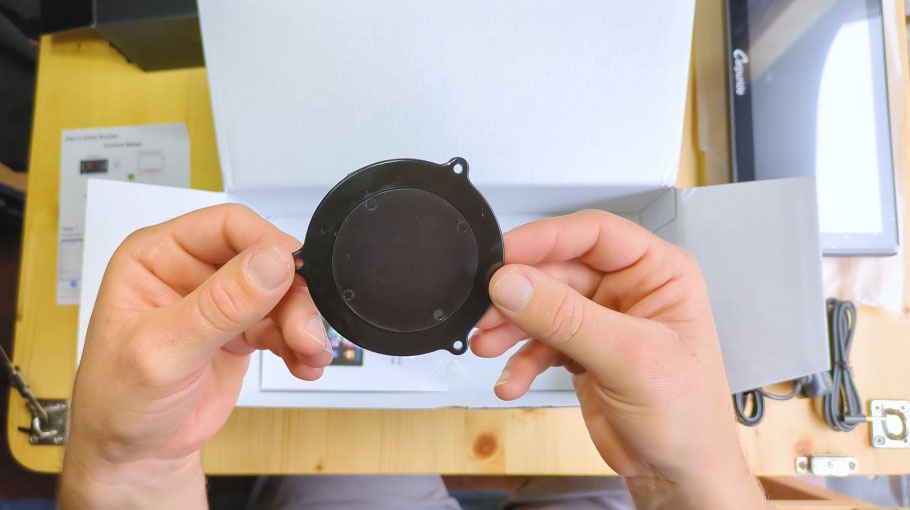
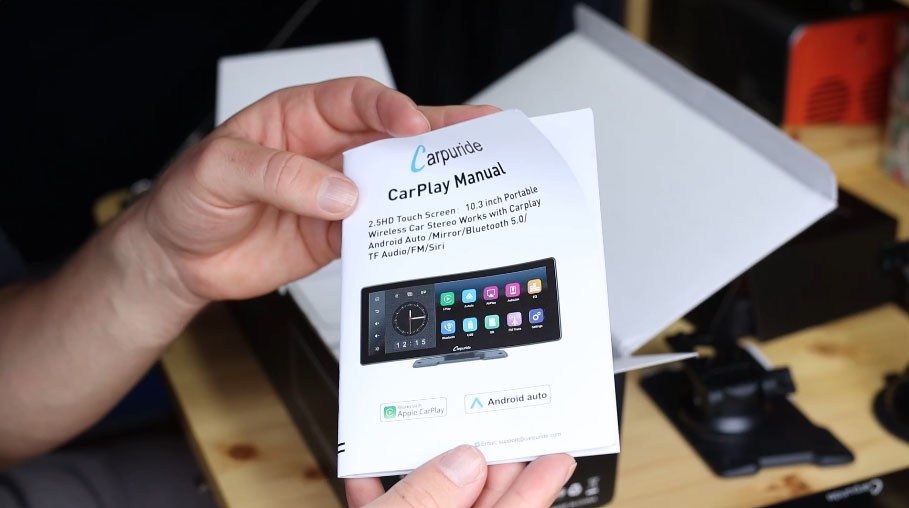
In the box you’ll also find a suction cup mount with an extendable arm, an adjustable sticky pad mount with a sticky pad, an aux cable, a 12v to USB-C adapter, an info sheet, a plate for the suction cup mount and a manual.


W103 Pro Features
On the bottom right corner of the screen you have the built-in microphone.
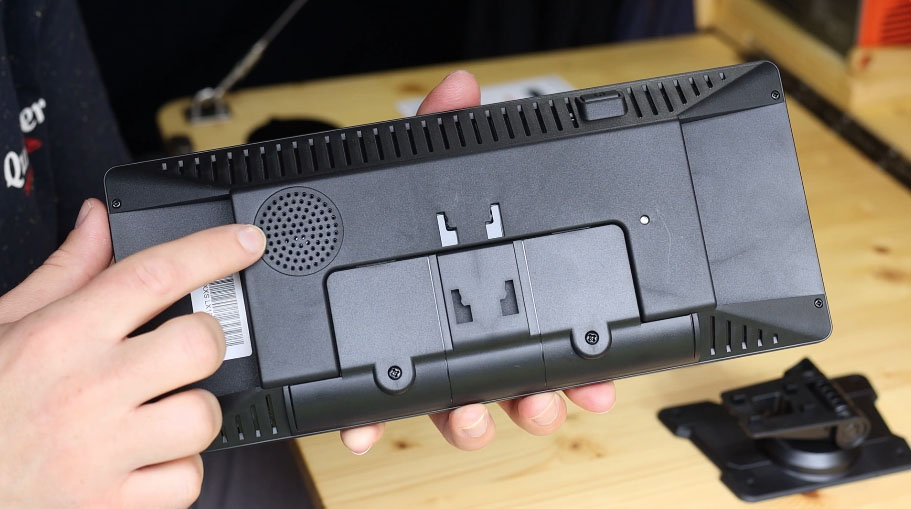
Turning it over, on the back you’ve got the built-in 5w speaker, the point where either of the two dashboard mounts can connect to, the sensor for detecting the light level to automatically adjust the screen brightness, and then a range of ports on the edge.
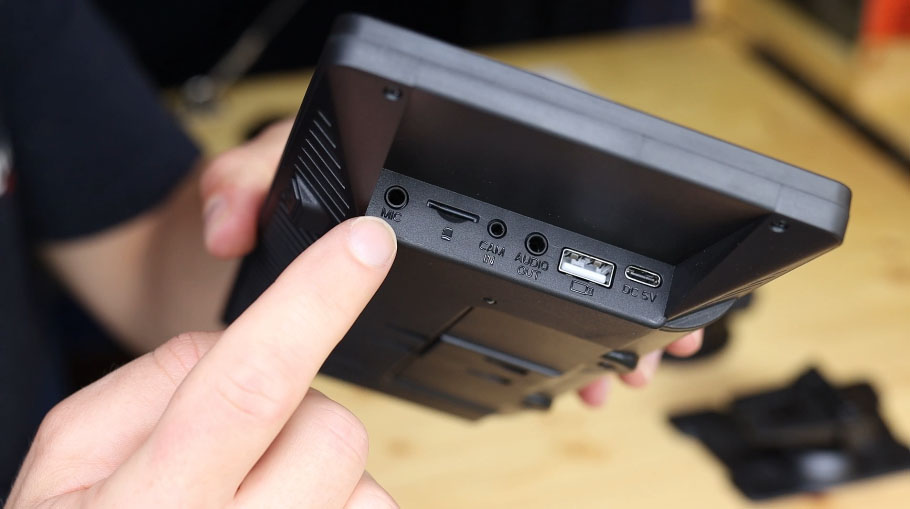
Starting on the left you’ve got a mic port so you can add an external mic for clearer calls, a micro-sd card slot for if you want to load your own music files, a 2.5mm reversing camera port, which is an optional extra for these devices, an 3.5mm audio out port, which is a wired method of playing music from the device through your car speakers, a USB-A port for if you want to play files from a USB device and a DC-5V or USB-C port, which will power the device using the cable provided. Finally, on the top of the device you have the power button. A short press of the button will bring up the volume bar whilst a long press will turn the device off and on.
I showed the two mounts the device comes with earlier and these firmly click into place and are very sturdy.
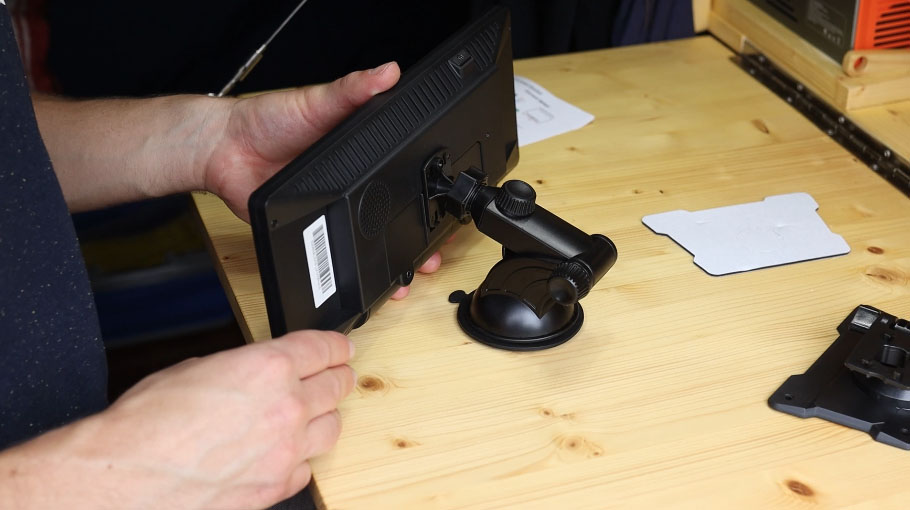
First, the suction cup mount gives the versatility of mounting the console on the window, the dashboard or pretty much any surface you want to. It’s a really effective suction cup which, after weeks of testing, hasn’t budged at all. The adjustable arm and base are really great for being able to put the screen in any direction or angle you want.
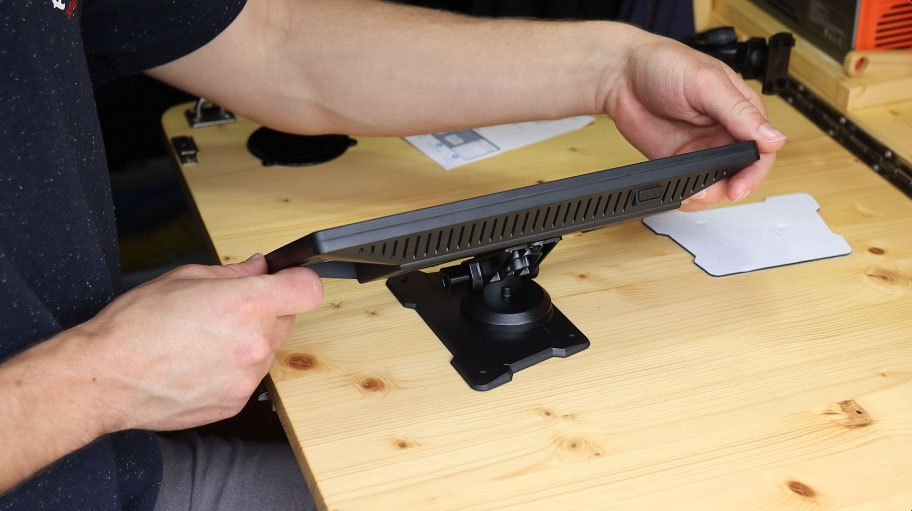
The flat mount with the sticky pad is a more permanent method of fixing and requires more of a flat surface to get a good bond, but would give an even sturdier attachment and is obviously a lot sleeker.
So let’s get the device turned on and have a look at the features and apps that you can use…
We’re also on Instagram!
Check out yogi.the.van to keep up-to-date with all our adventures in the van!


Screen Features & Apps
Plugging the console into the power via the USB-C port will turn the device on straight away, so it will always start up instantly when you start your vehicle. After the Carpuride loading screen, which they will customise for you if you send them an image or logo, the home screen displays all the apps, as well as a clock and further controls on the left hand side.

I personally think that it’s a really nice layout and the screen quality, being Full HD 1080p, is really clear. Also the touch screen is responsive and makes the device easy to use.

Starting on the left, you’ve got the help button, the volume up and down buttons – which can also be adjusted via the touchscreen too.
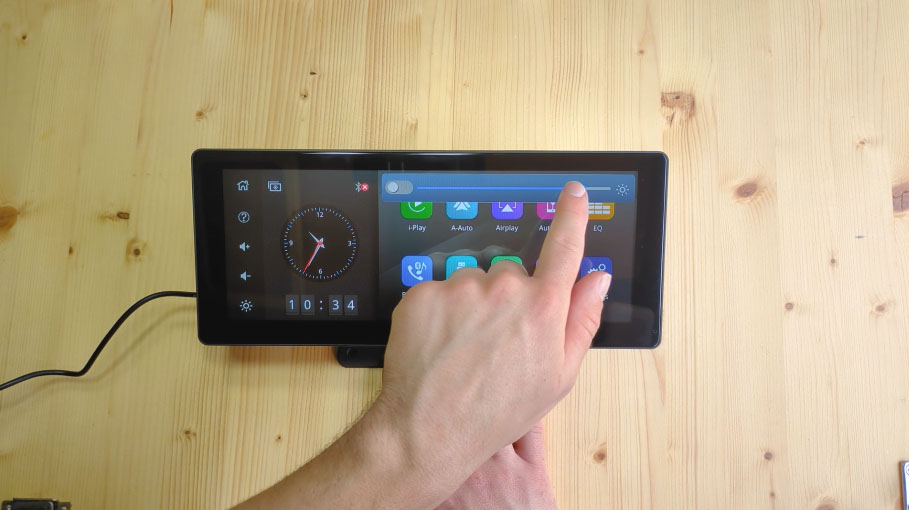
If you click on the menu, then you can adjust the music volume against the map volume. At the bottom of the menu you can adjust the brightness and the toggle on the left turns on auto-brightness, which is adjusted by the sensor on the back of the device shown earlier You can change the background by tapping the little rectangle icon and, whilst you can’t upload your own, there are four to choose from.
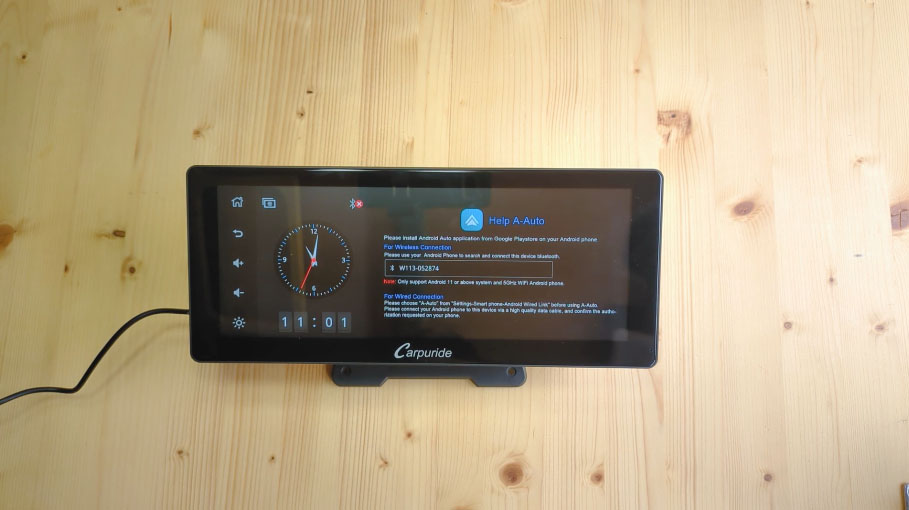
Moving onto the apps, you’ve got i-Play which connects an iPhone via CarPlay and A-Auto which connects an android phone via android auto. If you usually play music or navigate through a phone, then either one of these apps are likely what you’ll use the most. Next is Airplay, which is a wireless way to display your iPhone content on the screen, such as playing YouTube videos. Autolink is for a wired connection for both Apple and Android phones, but this requires downloading a separate app.

Moving along, the next app is the equaliser and there are a number of built-in presets, as well as the option to create your own.

Next is the Bluetooth app, and this is to make hands free calls from your phone. Here you can dial, view your call history, view your contacts, select music and adjust the set up.
Next are the USB and Card apps and, if you’ve got files on a USB stick or micro-SD card then you can plug them in here play your own music or view your own files from the screen. When you insert a micro-SD card which contains music, photos and video, after loading it automatically starts playing any music files it finds. At the top of the screen it shows you that you’re using the memory card port, shows how many tracks there are and gives you quick access to the equaliser so you can tailor you sound.

Going back, you can access the folders your files are in and, when I click on photos a few pop up. It’s a little slow, and it should be noted that these files are approximately 5mb each, but when you click on them you have a few options to control a slideshow of images. Although I’m just using these snaps of the van as an illustration of the device, this could perhaps be made more useful by storing useful vehicle documents in digital format here, just in case they’re needed. This is a good opportunity to talk about the quality of the screen as, being full HD it’s not only nice quality but the colours look great and are really vivid.

Unfortunately it wouldn’t play the video file I uploaded, with a message on the screen stating ‘it is illegal to view video whilst driving or operating a motor vehicle. Set parking brake to view video. As the device isn’t wired into the van, other than for power, so perhaps it’s something to do with the software?
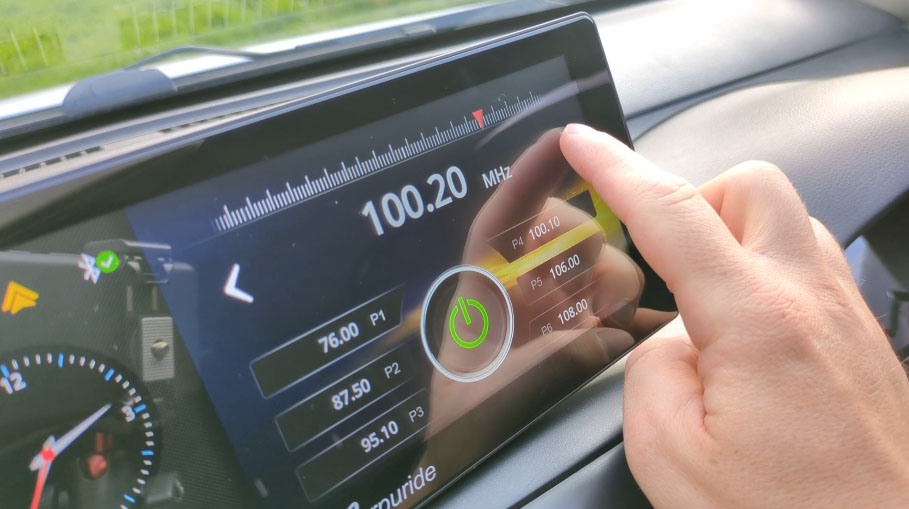
The Transmit app offers two ways to play music from the device, in addition to the built-in speaker and audio port on the back. The first is FM transmit and, using this, you can transmit your music to your car speakers through the radio. You can select and store 6 different frequencies. I haven’t forgotten about the Bluetooth Transmit connection, but will show it a little later when I connect the console to the van.
The final app on the screen is the settings and here you can select from a number of languages, change the time and time format, turn the built-in speaker on or off, select which side of the road you’ll be driving using the ‘right drive’ function, reset to factory defaults and check your system version. Next, you can change your wired link for Android from A-Auto to Autolink and likewise, for iPhones, from i-Play to iOSMirror depending on which functions you want to use. Then you have all your wifi settings and finally settings for the optional reversing camera.
Click to buy your own…


(Affiliate links which help support this channel)
Setting Up Android Auto on the W103 Pro
As I have an Android phone (Google Pixel 7a), I’ll only be setting this system up in this video but if the process for iPhones is as simple as for Androids, it won’t take long at all.

To set up your phone connection via Android Auto, tap the A-Auto app and search in your phone’s bluetooth for the device specified on your screen, tap it, select pair, and Android Auto will start loading on your console screen – it really is as simple as that.

You can then work through the short set-up on the console screen, and the app is ready to use. To access Android Auto from the home screen, you can either press the yellow arrow symbol or the app, but the device will start and load Android Auto as soon as the engine is turned on and it connects to your phone.
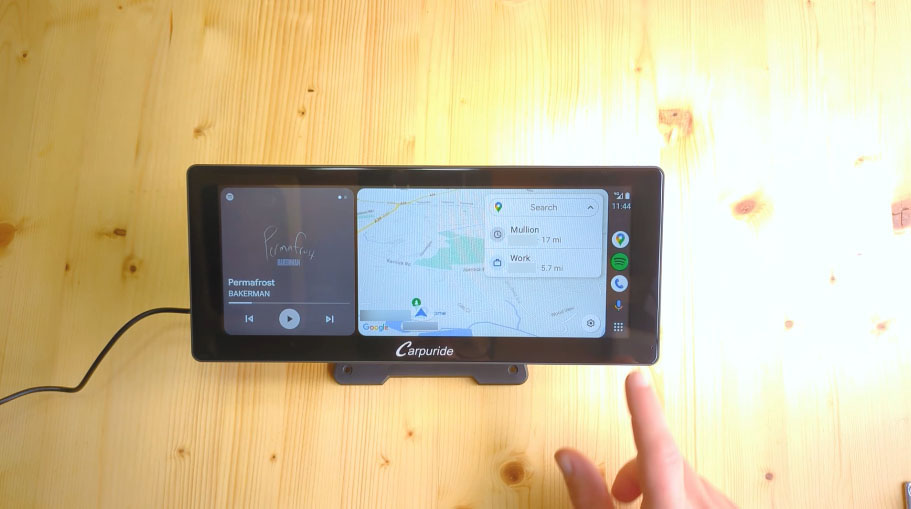
The screen is split between the map and your chosen music platform, with the map, music and call icons along the right hand side of the screen. At the bottom right is the menu to access the apps, and these are all apps that I have installed on my phone and are compatible with Android Auto.
Attaching The W103 Pro In The Van
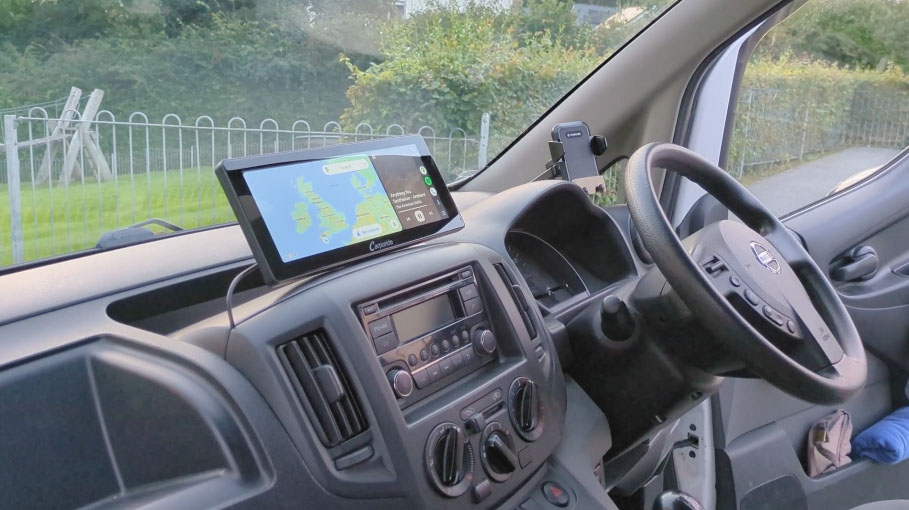
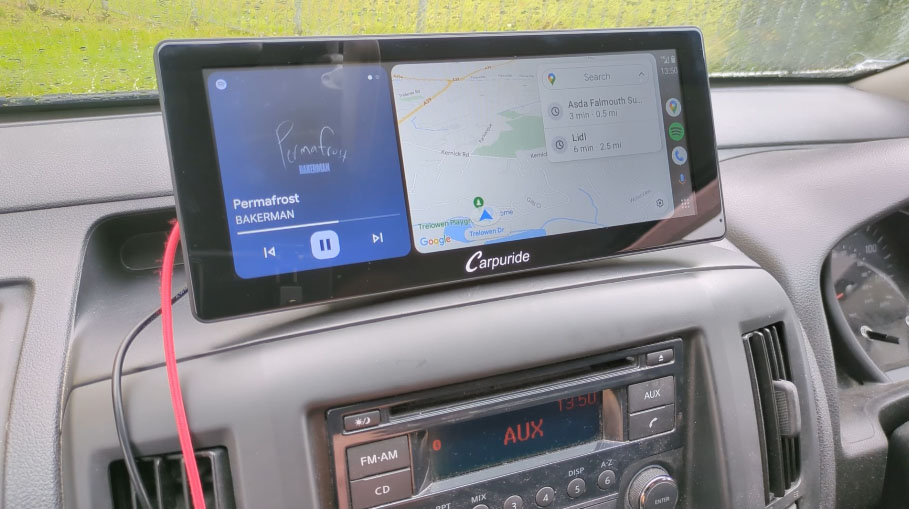
It’s now time to install the device onto the dashboard of the van and it really is as simple as deciding your position, and choosing which mount you’d like to use. I considered the sticky pad mount, but due to the slight curve on my dashboard I wasn’t sure how good the adhesion would be, so I opted for the suction mount straight onto my dashboard and, utilising the extendable arm, I could play with positions and then stick it down and, thanks to its sleek design, it really just feels like an extension of the dashboard and is at a nice level to look at whilst driving.
Click to buy your own…
(Affiliate links which help support this channel)
How To Use The Carpuride W103 Pro
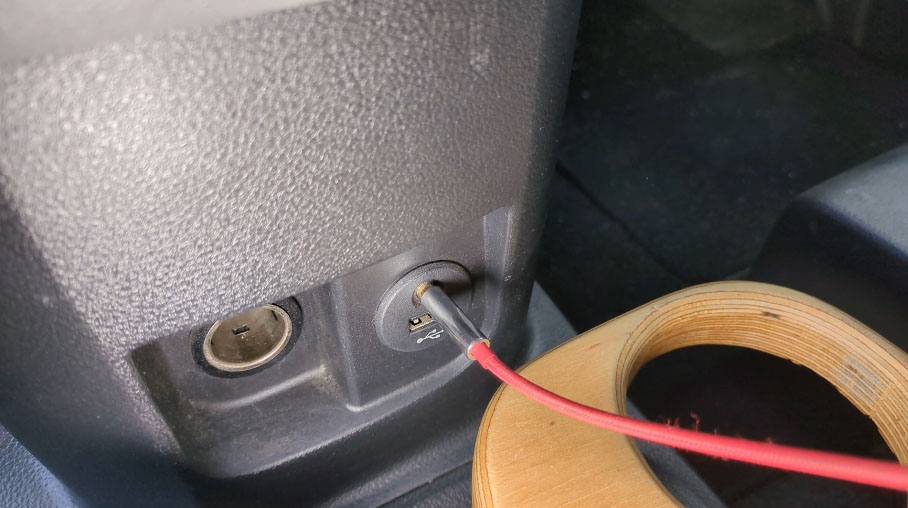
Plugging the power cable into the 12v port of the van and then the USB-C port of the console, it powers on quite quickly and if I turn it off and then on again from the power button, it takes 28 seconds to start-up, automatically connect to Android Auto and start playing music..
I mentioned earlier that there are four ways to play sound from the device. The first being the built-in speaker, whilst the second is using a wired connection via an AUX cable directly into the vehicle, assuming that said vehicle has a AUX port. This is an instant and reliable way of playing music, but it does add an extra wire to your dashboard.
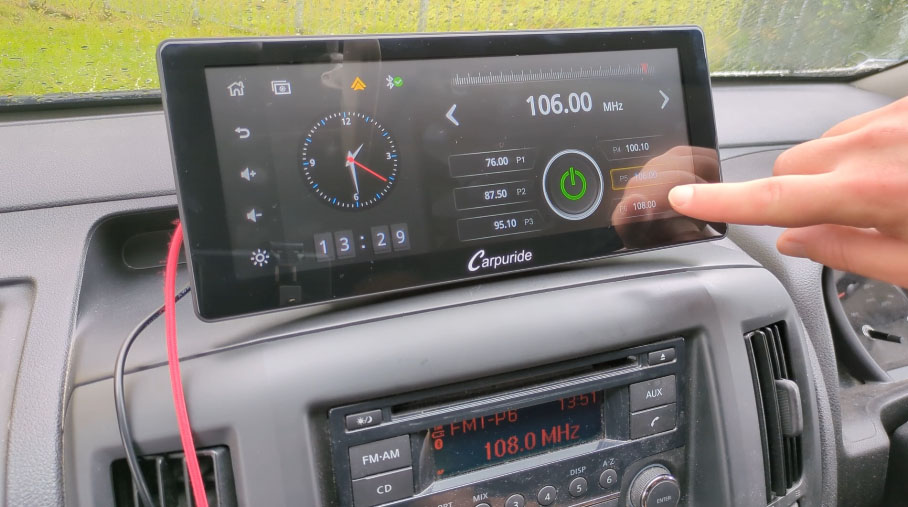
The third way is via FM transmit, which I touched on earlier too. Simply select your frequency on the console, save it to one of the 6 p-numbered slots by holding down on the frequency, and then tune in to that frequency on your vehicle. It can take a little bit of time to find a blank frequency, and it doesn’t quite have the quality of a bluetooth or wired connection, as there can be some crackle in the background, but it’s an instant connection which doesn’t have the delay that connecting to bluetooth has.
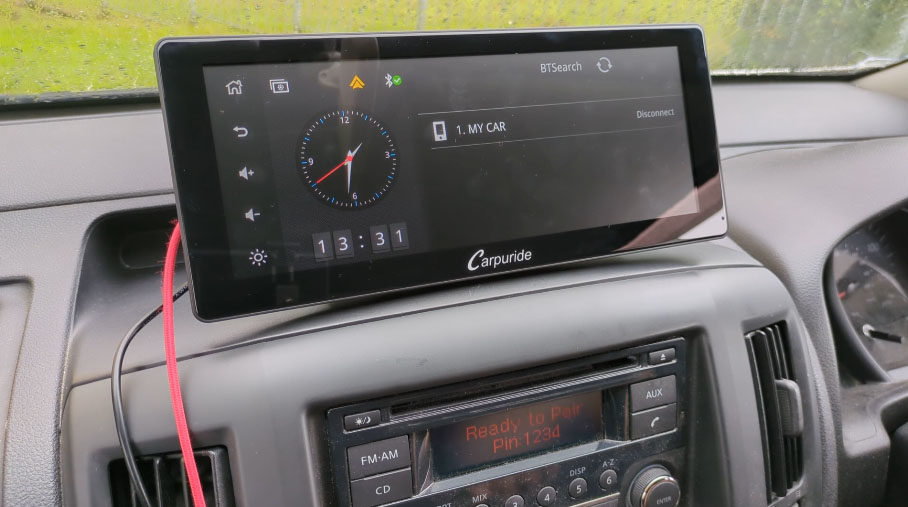
The fourth and final playback method is bluetooth. Hit the Transmit app on the homescreen, and tap BT transmit, make sure your vehicle is ready to pair and tap your vehicle’s bluetooth when it appears on the console’s screen. Enter the PIN and you’ll be connected. Going forward, the console will connect to your vehicle’s bluetooth and play using that method instead.
It should be mentioned at this point that the PRO in the W103 PRO product name is due to its enhanced bluetooth features. According to Carpuride, their range of Pro devices enjoy better sound quality and a more stable bluetooth connection.
Is the Carpuride W103 Pro Any Good?
So that’s the Carpuride W103 Pro set up and ready to use and, other than fiddling with a few settings, there’s been no need to change the head unit or stereo, or faff with wiring – it really is a cost-effective plug and play solution for adding some really useful tech to my own van conversion or any car that you want to upgrade without shelling out serious money.
For a finishing touch, I’m going to hide the cable in the dashboard to make it a bit neater and so the cable can’t get pulled by accident, and it wasn’t too difficult to find a way from the device down to the power sockets in my van.
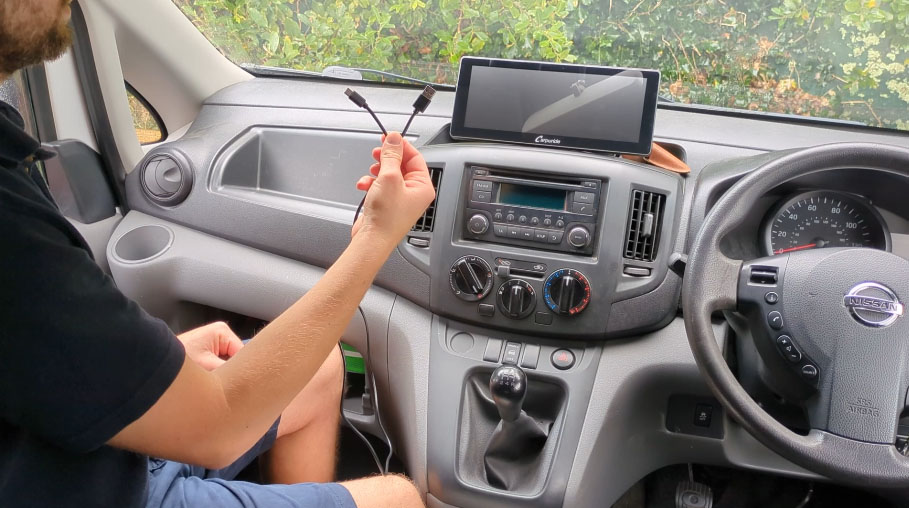
As you may notice, I’ve switched from the 12v to USB-C power cable supplied to the device to a USB-A to USB-C cable, which works equally well, and this is just because I had a spare USB-A post in the van that I could use. The cable is also a little thinner too, which helps with getting it through the dashboard panels.

How much does the W103 Pro cost?
At the time of making this video, the W103 Pro is £330 but there are lots of other models in different sizes, as well as accessories to suit every set-up and budget.
If you’re interested in buying one or finding out more, click on the links in this article or head to the Carpuride website and use discount code LENSOFJAMES for 15% discount code in the description below which help support this channel.
For transparency, Carpuride provided the W103 Pro for me to test, but the thoughts in this review are entirely my own and based on my experience using the device.
After a few weeks of using and testing the device, I’ve been really impressed with how sturdily it sits on the dashboard, and how it’s performed.
The only slight issue is that the device doesn’t always connect to my van’s bluetooth first time, but I have had issues with phones connecting to my van bluetooth in the past, so it may be more of a NV200 problem. That said, the beauty of the device having multiple methods to connect is that I can instantly switch to the FM transmit and the music will play. Note this bluetooth issue is purely when playing music, and my phone connects to the device with Android Auto flawlessly every time.
There are definitely some functions that I won’t use much, especially depending on which phone you’ll be connecting but it caters to a lot of people and does a great job with it.It’ll have a permanent home in my van conversion though, and if you’re curious about what else I’ve done to the van, be sure to check out my other van build articles and videos!
For transparency, Carpuride provided the W103 Pro for me to test, but the thoughts in this review are entirely my own and based on my experience using the device.
If you want to see more of my camper van build in action, please CLICK HERE.
Click to buy your own…


(Affiliate links which help support this channel)
