
This article is a written account of a video from the Lens Of James YouTube channel. Watch the video above and subscribe if you like what you see!
This article contains affiliate links to relevant products I have used in my videos. By buying through these links, I receive a small percentage of the sale at no cost to you which helps me support and grow my website and YouTube channel, so I can create more content like this in the future. Thank you for your support.
In this, the next instalment of my van conversion, I’ll be sharing how I insulated, lined with plywood and carpeted the ceiling of my Nissan NV200.
My thought process
With one of my main priorities being to save as much space as possible on this van build, the ceiling was one place where my choices could have a huge impact on this. I have seen many van builds which fill cavities between the metal ceiling beams with thick insulation board, which is great…if it doesn’t impact you being able to stand or even sit up in the van.
Fortunately one of the first things I did when I got my van was build an expandable bench/bed. I found that the bench/bed got more support – and require less legs – by resting on the wheel arches. This was pretty much the lowest I could make the bed, but if had made the bed any higher my head would have hit the ceiling just from a sitting position, which was something I wanted to avoid at all costs. I’m not a tall person (5’6″) so factor in 1+ inches of ceiling insulation and I’d have a very achy neck!
My whole premise for converting a panel van into a camper is to have comfortable base for day trips, surfing and camping adventure and so I took the decision to continue to use the thin Thermawrap foil bubble wrap insulation on the ceiling as well, instead of insulation board.
By insulating in between the beams, then placing a smart but protective layer of thin ply over this, I’ve reclaimed considerable amount of headroom and looking back this was definitely the right decision for my van build.
Getting started
My first step was to prepare the van. As you’ll see below, it already had plywood panels on the ceiling, with foil bubblewrap insulation taped between the boards and the metal.
I had done this some months earlier as a temporary measure. Whilst staying the the van I noticed a lot of condensation every morning, but also as autumn came, the colder morning meant the ceiling was dripping wet even when I hadn’t stayed the night in the van.
By taping the foil insulation to the ceiling, I was able to learn over time that Thermawrap really does keep away the condensation.
The time had come to make this insulation permanent, so I removed the ply panels and insulation to start from scratch and undertake a proper job on it.

Making the plywood ceiling panels
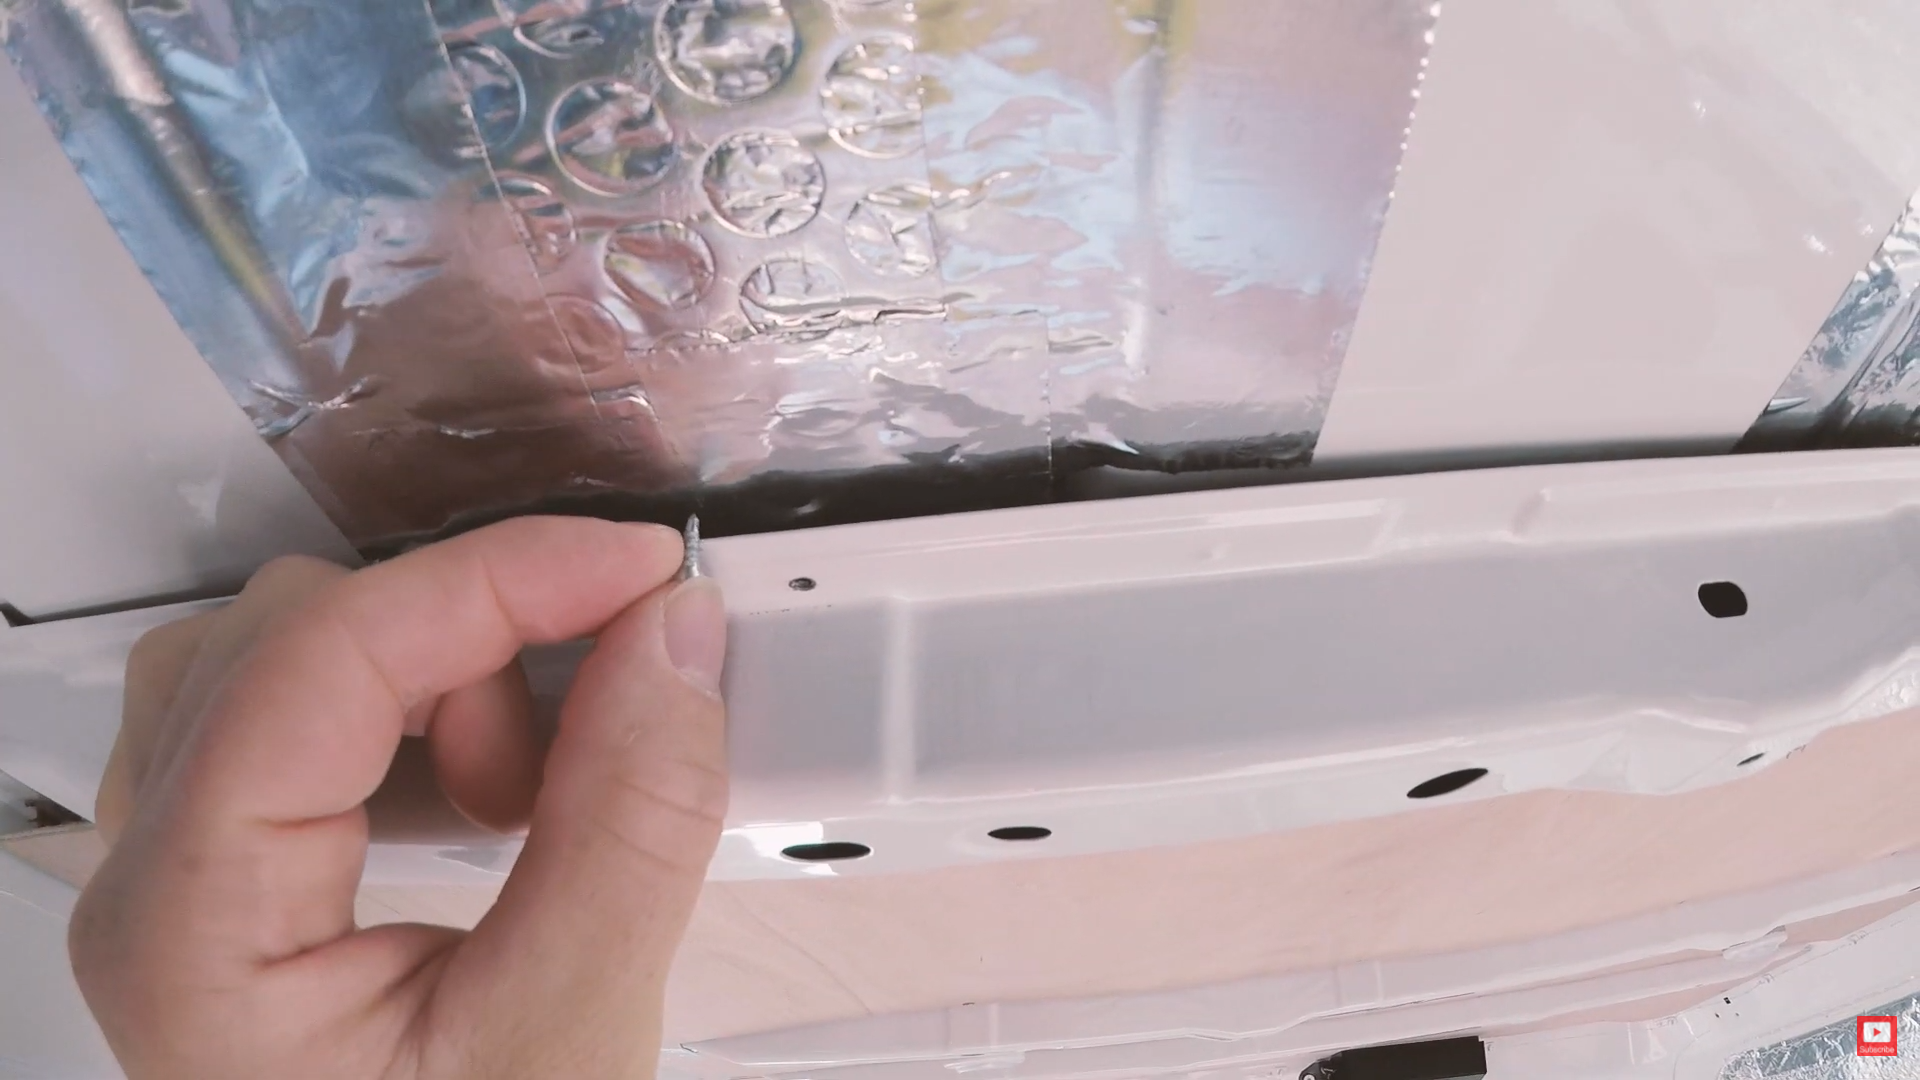
I measured and scribed the ceiling panels then cut them to size out of 3.6mm plywood, which was thin enough to bend with the curve of the roof, and then I screwed them into the raised edge of the ceiling beams (being VERY careful not to go through the roof!). I used 4.2mm self-drilling metal screws sourced on eBay to attach it to the ceiling.
Click to buy your own…


(eBay affiliate links which help support this website)
After removing these plywood panels, I removed the main insulation and started coating the holes made by the screws in metal primer to prevent any rust in the future.

We’re also on Instagram!
Check out yogi.the.van to keep up-to-date with all our adventures in the van!


Filling the ceiling beams
Next, I started taping off the beams with masking tape so I could fill them with expanding foam. As I would be carpeting over the beams, I didn’t want them to end up pooling condensation and with limited access inside the beams foam was my best option.

Once the foam was dry, I removed the tape and scraped off any excess. Using white spirit I was able to clean off any leftover residue.
Gluing the insulation
The NV200 ceiling has 4 raised areas running from the front to the back of the van. When I originally insulated the ceiling, I decided to fill these with strips of foil insulation to bring these to the same levels the rest of the ceiling. I could then tape larger insulation panels over the top, without any gaps for condensation to form. As I’m now gluing my ceiling insulation in place, it isn’t strictly necessary to fill these raised areas and the glued insulation would conform to the tape of the ceiling, however I already had them in place, so I glued them in place.

To save removing all the strips, I simply cut the strips in the middle, glued them with Trimfix contact adhesive, stuck them back in place and taped over the cut with aluminium foil tape. I was then able to glue my large insulation panels over the top using the same method. To finish them, I taped all the edges and the ceiling was now ready for carpeting.

Carpeting the beams
Having sent off for a number of samples, I chose to use smoke-coloured carpet. The reasoning here was that as I don’t have windows in the back of the van, it wouldn’t make the back too dark, whilst being dark enough to hide any marks or dirt.
To cover the ceiling, I purchased a 1 metre length of 1.4m wide carpet and this was more than enough for the area I was covering.
Laying the carpet out, I cut strips to span the width of the van, giving myself plenty of excess. Using Trimix contact adhesive, I stuck the carpet to the beams, making sure to apply plenty of pressure, especially in the corners to provide good contact and to keep the contours of the beams. I trimmed the edge of the carpet to the corner edge of the ceiling and continued onto the other 2 beams.


I also carpeted the front of the van, where the cab meets the back as I had some leftover carpet and this would need to be covered either now or in the future in any case.
Click to buy your own…


(Affiliate links which help support this website)
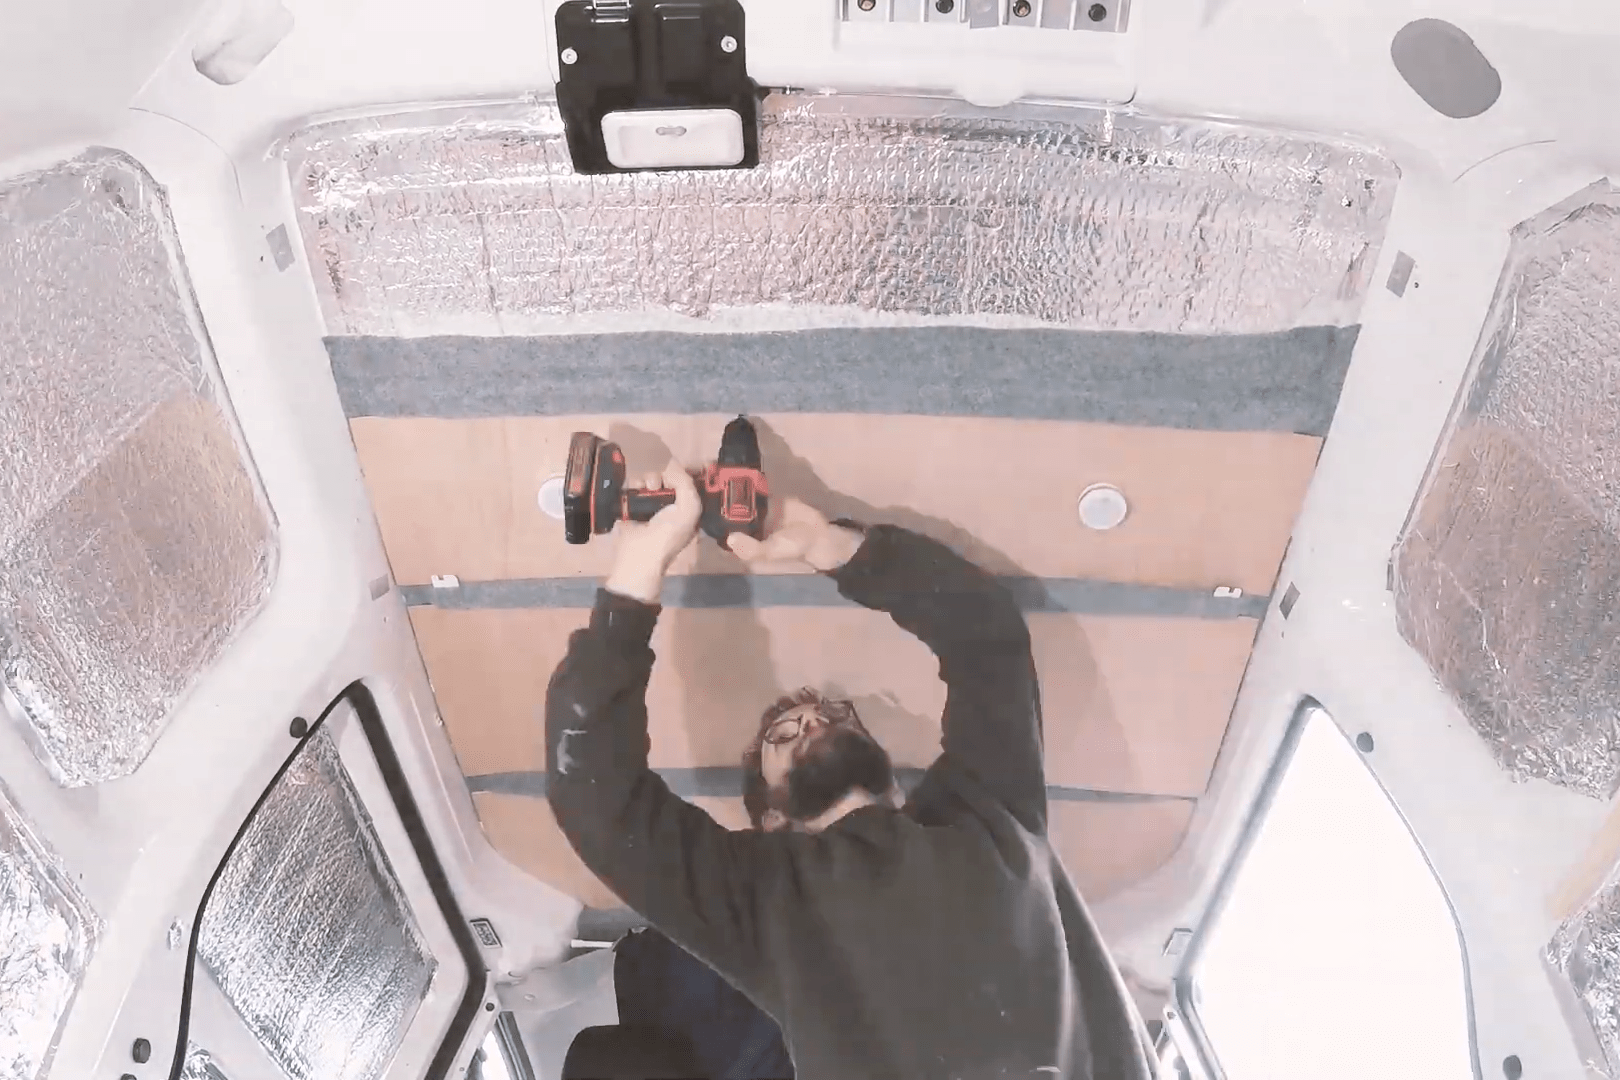
Replacing the ceiling plywood
After making a couple of adjustments to the ceiling ply to account for the added thickness of the carpet, I was able to locate the original holes and screw the plywood back into place.
Overall, the carpet and plywood look really good together and I’m very happy with the result. There are a couple more adjustments that I hope to make, to ensure the ply fits a bit better, and I intend to put velcro on the top side of the boards to get the edges to hold to the carpet so they don’t hang down but other than that, the ceiling is finished!

If you want to see more of my camper van build in action, please CLICK HERE.


(Affiliate links which help support this website)

7 responses to “Insulating, Ply Lining And Carpeting The Van Ceiling”
[…] post on insulating, carpeting and lining my van ceiling at a later date (update: van ceiling blog/video), but I thought I would include the highlights here: I used the same process of gluing […]
LikeLike
Thanks for this article and the video. Very useful. Can you point me in the direction of where I can get the same screws you used for attaching the ceiling ply panels?
LikeLike
Hi Steve, I got these 3.5×9.5mm screws from eBay: https://www.ebay.co.uk/itm/162145704947
LikeLike
Thanks! Appreciate the info.
LikeLike
I think the point you’re making is to avoid the condensation you experienced, fill ‘all’ airgaps by fully gluing the foil bubble wrap (Reflectix) in place and putting foam in the beams. A couple questions though I’m uncertain about:
1. You had used foil bubble wrap (Reflectix) already in the narrow front-to-back running roof troughs by taping the edges. Are you saying that due to them ‘not’ being glued directly to the roof they sagged a bit in the center creating areas for condensation to form between roof and Reflectix?
2. If I got that wrong, what do you believe to have been the cause of the condensation beyond the previously empty side-to-side roof beams?
I just purchased an NV200 and here is how I was considering ceiling insulation:
1. Fill forward-to-back narrow troughs with wool insulation.
2. Glue a sheet of Plaskolite (corrigated vinyl) with open edges sealed directly to roof in between foam filled beams.
3. Reflectix glued to the Plaskolite between-beam sheets.
4. Wool insulation under a decorative panel screwed in place.
The edge sealed Plaskolite provides an airgap supporting little to no conductive heat between the metal roof and the Reflectix.
I’d appreciate your thoughts on this layering.
Thanks again for a great video and step-by-step. I’d be very interested in hearing how your installation has both resolved condensation and to what extent you feel it is keeping the inside insulated from the outside heat or cold.
Ron
LikeLike
Hi Ron, sorry for the delay in replying. It’s worth bearing in mind that I sleep in the van less than 20-30 nights a year, and the rest of the time I just use it as a day leisure vehicle, which informs my insulation decisions greatly.
There are 2 reasons that I glued foil insulation in between the ceiling beams. The first is because I wanted to save as much headroom as possible (as opposed to using thick insulation boards or wool). I’m 5’6″ and there’s only a couple of inches left above my head when I’m sat upright on the bench/bed. The second is that, because I was carpeting the beams, I didn’t want to carpet over insulation which wasn’t firmly glued down, as it might sag or come away in the future. Since insulating the ceiling, I’ve had no problems, although I know some people don’t recommend gluing the foil insulation down as this removes the air gap.
So in answer to your questions: 1. The insulation doesn’t pool condensation or sag, I just glued it down because of the reasons above. 2. The condensation on the bare metal roof comes from breathing when sleeping in the van, or just the weather/air temperature as autumn and winter come round, and I wanted to reduce this.
I hope that helps answer your questions – good luck with your van build!
LikeLike
Hi James, Thankyou for the additional feedback on considerations involved with your insulation choices. I’ve enjoyed your series of videos and taken so much useful information from them for my own NV200 conversion. My intent is to live for longer periods in the van while I stop at to hike and backpack through US National Parks. Still waiting for materials to arrive and excited to start.
LikeLike