
This article is a written account of a video from the Lens Of James YouTube channel. Watch the video above and subscribe if you like what you see!
This article contains affiliate links to relevant products I have used in my videos. By buying through these links, I receive a small percentage of the sale at no cost to you which helps me support and grow my website and YouTube channel, so I can create more content like this in the future. Thank you for your support.
An introduction to tapping a fuse in your car
If you’ve got a device for your car such as a dash cam or dashboard console which comes with a hardwiring kit, then this video is for you.
Tapping a fuse, or connecting the hardwire kit to existing fuses, can seem a little daunting but is easily achievable once you’ve done a little research, which is where this video comes in as I’ve done it all for you.
Here I’m hardwiring in a dashboard console, the Atoto P909PR, which I recently did a full review on, and this is two fuses to tap and, though it’s common to just tap one fuse, this video covers the principles of both.

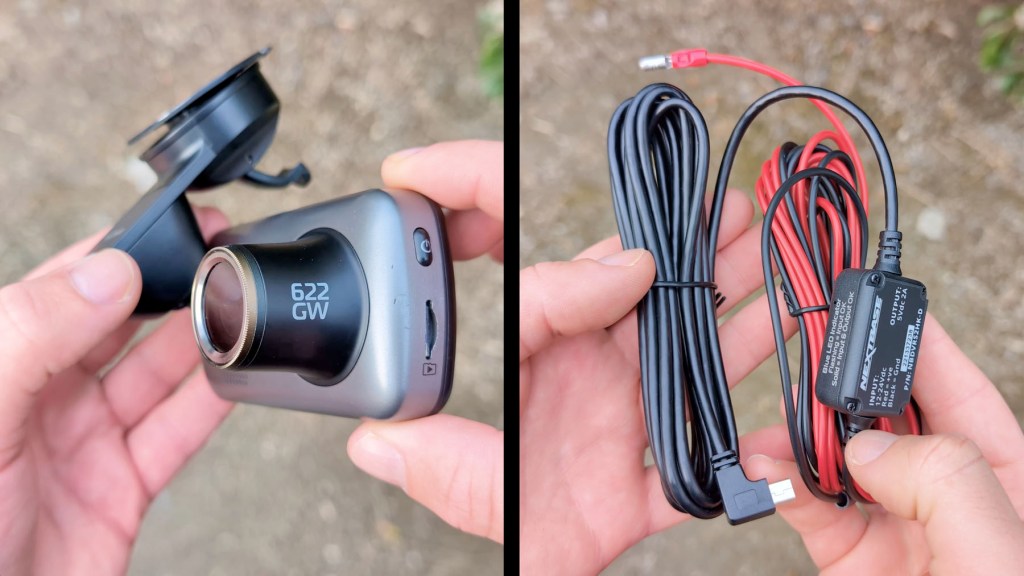
You might want to hardwire a device into your vehicle for a few reasons; as it’s the only way to power it up and to facilitate ultra fast startup, such as with the Atoto console; or it could be to free up your 12v cigarette lighter port, or so that you have a device that’s always receiving power, such as for the parking mode on a dash cam like the 622GW from Nextbase.
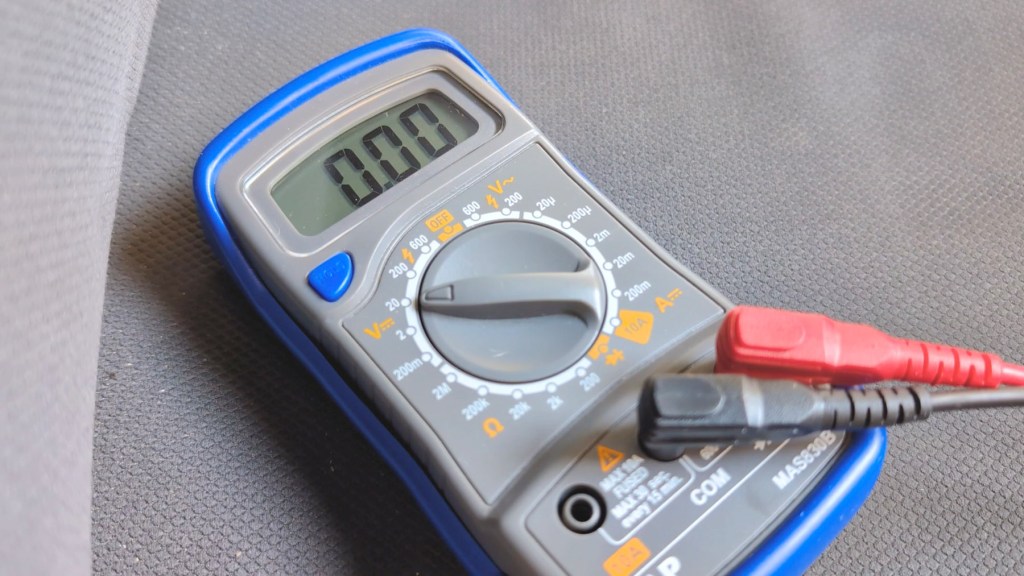
You’ll need only a couple of tools to complete this job; a digital multimeter, a screwdriver or socket set, and some trim and panel removal tools, and there are affiliate links to everything you might need throughout the article if you want to get them for yourself.

And just so you know Atoto provided the P909PR for me to make the review video I mentioned, though they haven’t asked me to make this one. I just thought it would be fun to share a how-to on hardware and dashboard console into your car.
Lastly before we get going if you’re not sure about doing the job then do get someone qualified to do it for you. I’m just sharing how I did it for my van and all vehicles will be different this article is for entertainment purposes only.
Click to buy your own…


(Affiliate links which help support this blog)
The four steps to tapping a fuse
There are four main steps to tapping a fuse which we’ll cover through the video.
- Find the right fuses to use
- Check which direction the power flows in and out of the fuses so you can put the fuses in the right way
- Insert the fuse taps and fuses
- Attach your hardwire kit to the device, so let’s get started!
Step 1 – Finding the right fuses to use
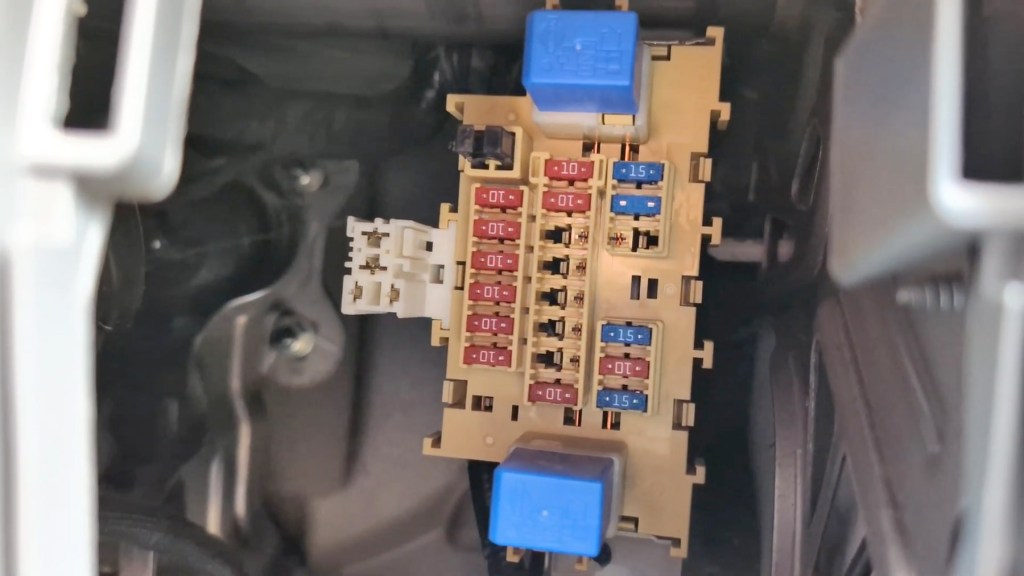
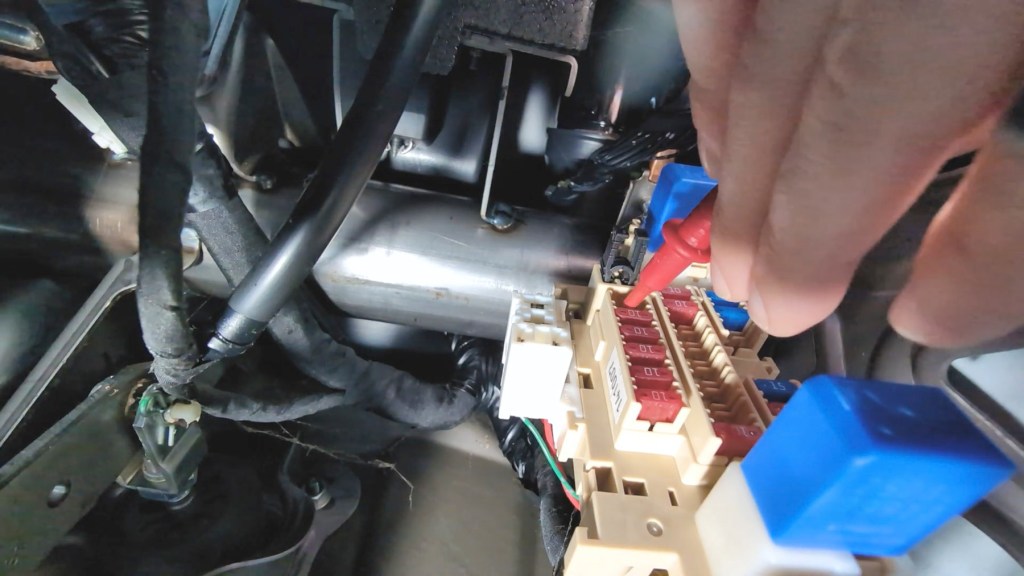
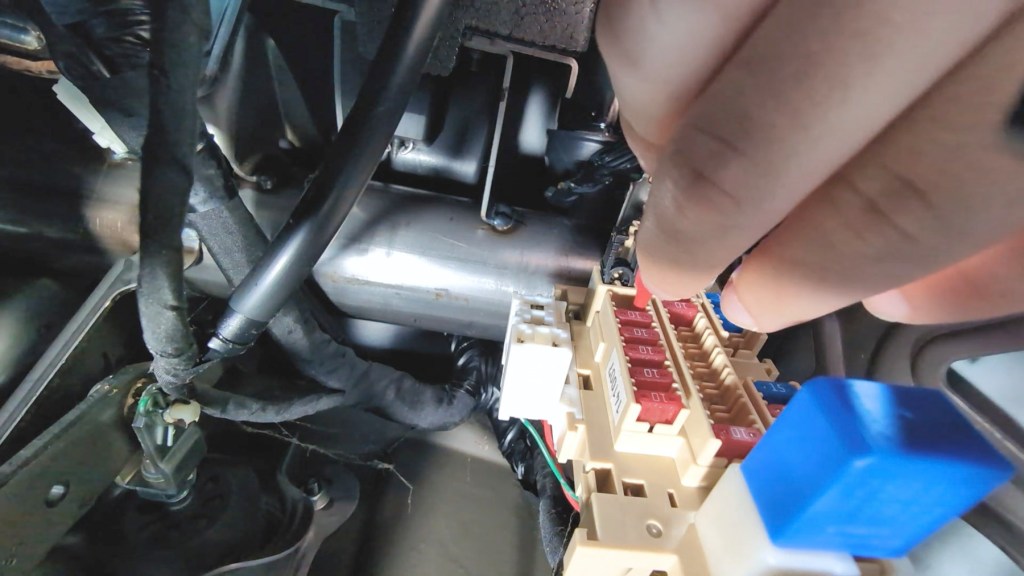
To begin, locate your vehicle’s interior fuses which are usually found around the steering wheel or glove box. Mine are to the bottom right of the steering wheel in my Nissan NV200.


As you can see there are a bunch of them in there, some upside down and a load of empty gaps too. I don’t have the higher spec of this NV200 van, so a lot of those empty ones are for features I don’t have but other models might.
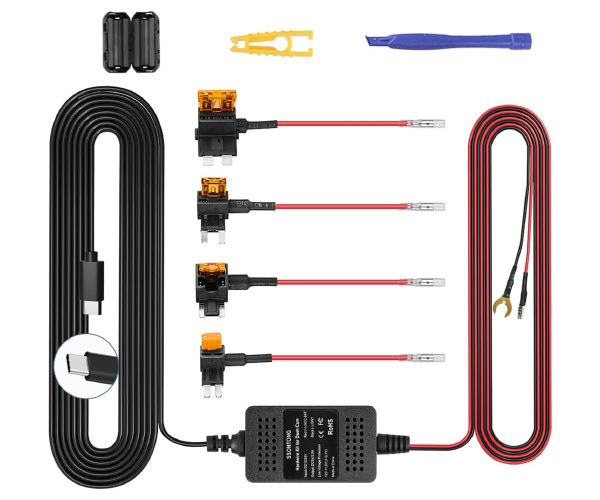
On the Atoto hard wiring kit you have two wires which need to be connected into the fuse box. A red wire, which is labeled ACC, meaning that it needs to be attached to an accessory fuse, or one which is only powered when the vehicle ignition or engine is on. The second wire is yellow and is labeled B+, which stands for battery and requires a fuse which delivers constant battery power regardless of whether the vehicle is on or off.

Be sure to check whether your device or hardwiring kit requires an accessory fuse or a constant battery fuse to tap before proceeding.
To find which fuses you should tap into, you’ll need a digital multimeter set to 20 volts in the DC range.

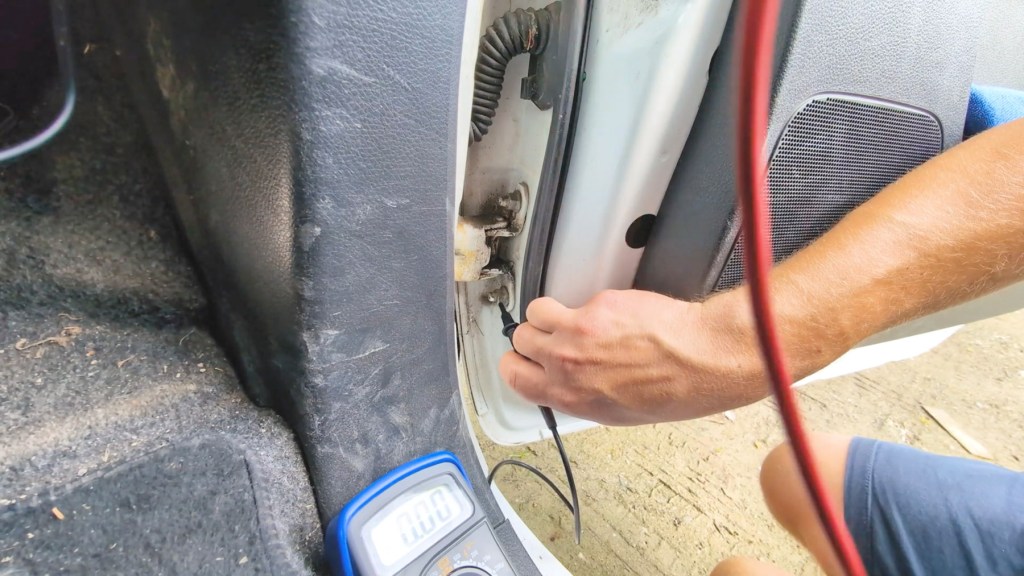
With the engine off and the key out of the ignition, ground the black probe on an uncoated clean bit of metal attached directly to the vehicle, such as a bolt like I found on my door here. Then work your way around the fuses in the fuse box with the red probe, touching it to the exposed metal dots on the backs of the fuses.
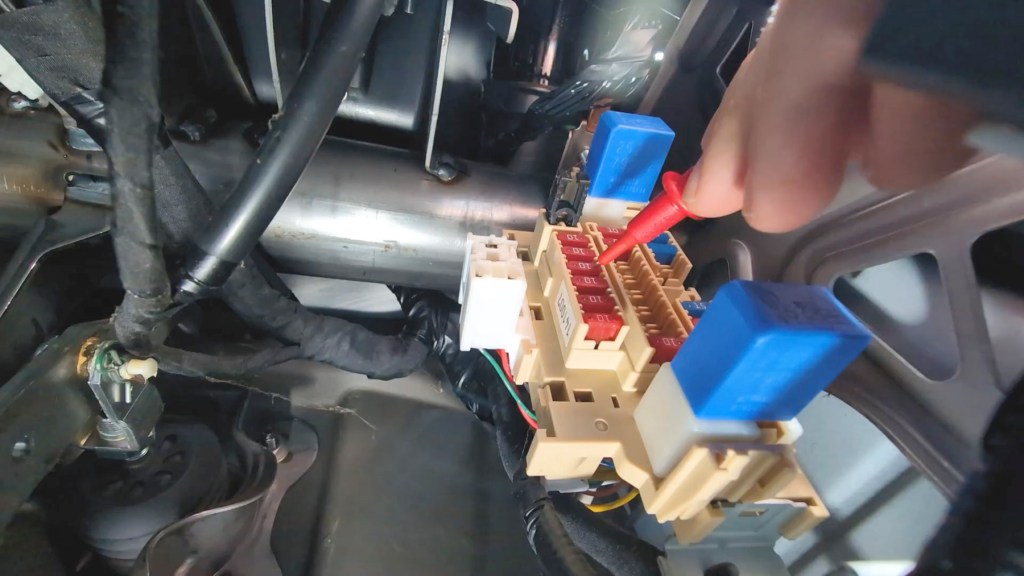
If your multimeter shows a voltage which should be above 12v, then you’ve got a fuse which uses constant power or a B+. You can probe either dots on the fuse to find this out as both will display a voltage if there’s one present, as the power flows through the fuse.
Next it’s time to find the accessory power fuse. Chances are if you found fuses that don’t do anything when the ignition is off then they are accessory fuses. For tapping one you want to find an accessory fuse which isn’t integral to your vehicle’s driving functions, such as the audio system.
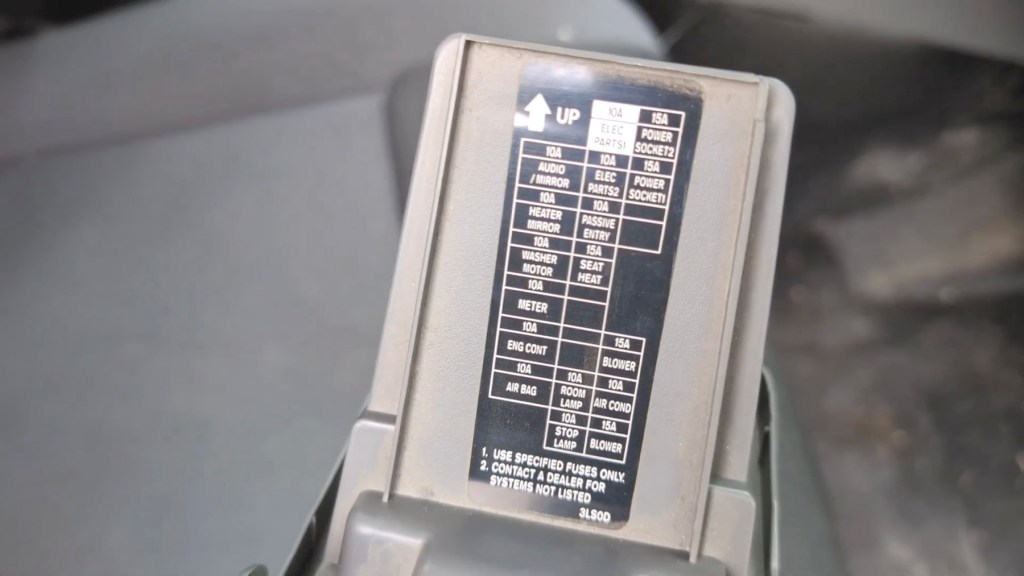
You can find out what circuit your fuse is protect by checking out the back of the fuse box cover, which usually has a full list. Once you found fuse you like the look of, test it with the ignition off, then put the key in and the ignition on and test again. Hopefully a voltage of 12+ will register on the multimeter.
You can then remove the relevant fuses from the fuse box, and I took a photo of the fuse box on my phone beforehand so that I know exactly what originally went where.
Fuses are tightly packed and often in hard to reach places but many vehicles have a fuse puller, such as the one I have tucked away here which helps with a job, and if you don’t gently and carefully using a pair of long-nose pliers will do the job.
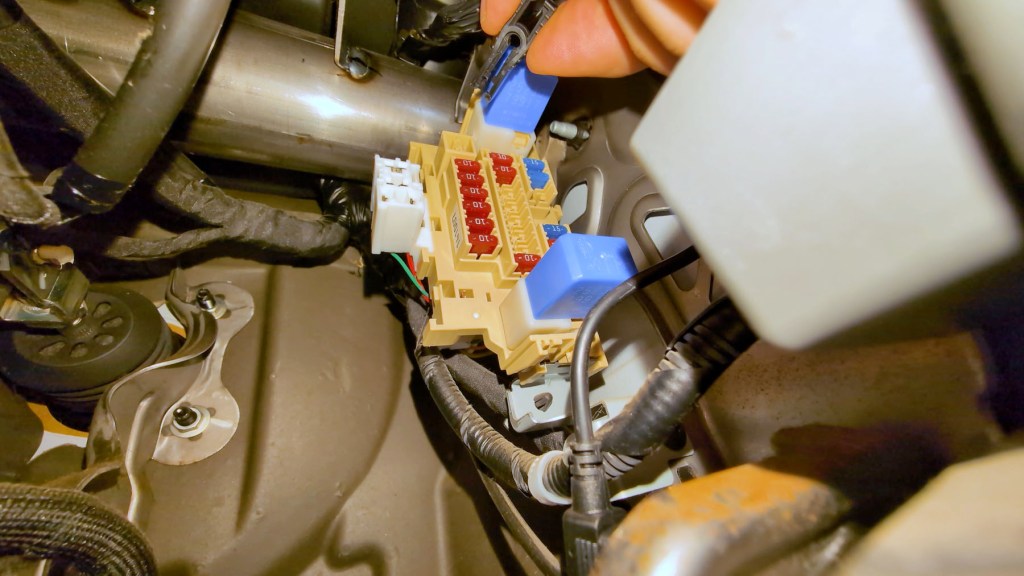
At this point, you can see which size of fuse tap fits your vehicle.

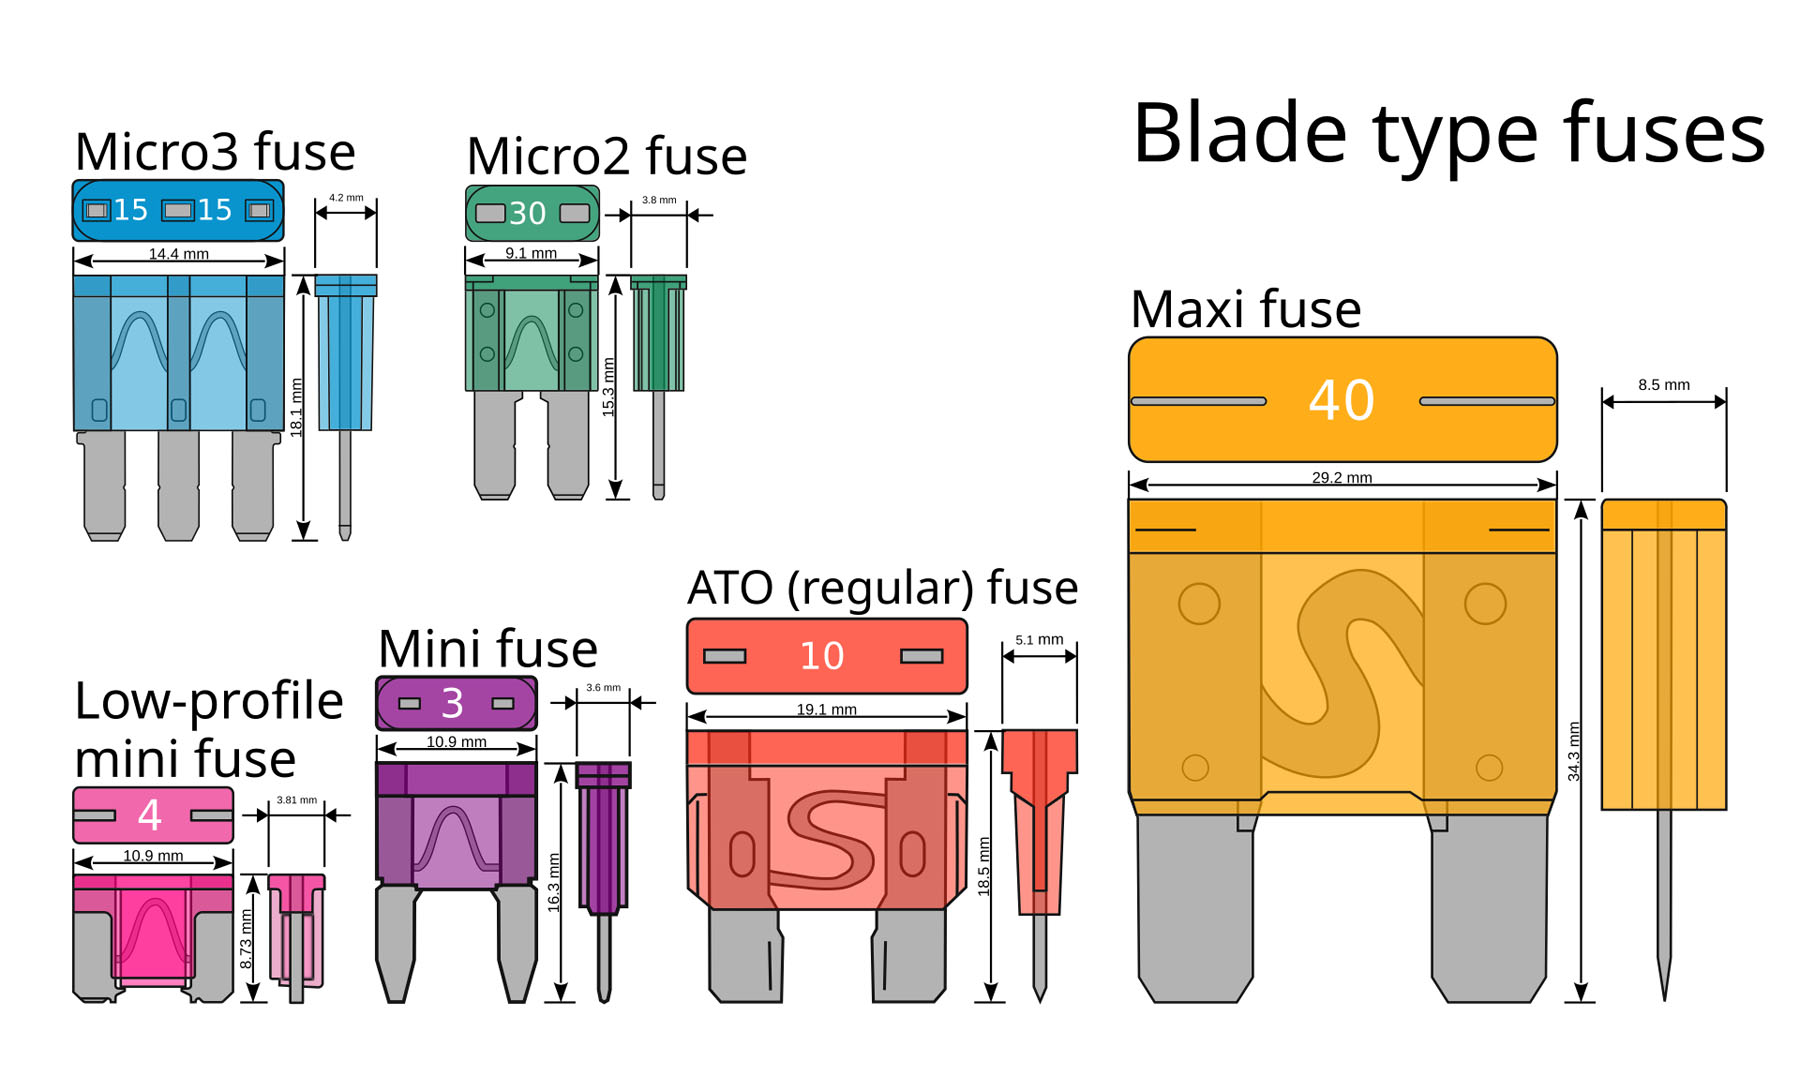
There are four types of fuse tap included in the Atoto console box; Mini, which my van takes, Micro2, Low-profile Mini and ATO, which cover the majority of vehicles though there are two others, Maxi and Micro3 which you may come across. In this kit they each include a 5 amp fuse.
Click to buy your own…

(Affiliate links which help support this blog)
Step 2 – Check Power Flow Direction
The next step is to find out which side of the fuse slot the current comes in as this is important to getting the hardwire and kit working properly.
To do this insert the red probe into one side of the slot you’ve just removed the fuse from, with the black probe grounded on bare metal again, and then check the other side. For the accessory fuse you’ll need the ignition on, whereas the constant battery fuse slot will show power whether the ignition is on or off.
Make a note of which side has power and which doesn’t, as the fuse tap only works in a specific way. The outer prong is the entry for the voltage, whereas the inner prong is where the voltage exits. That means that the outer prong needs to connect with the side of the fuse slot which shows a power reading, so when inserting the fuse tap completes the circuit.
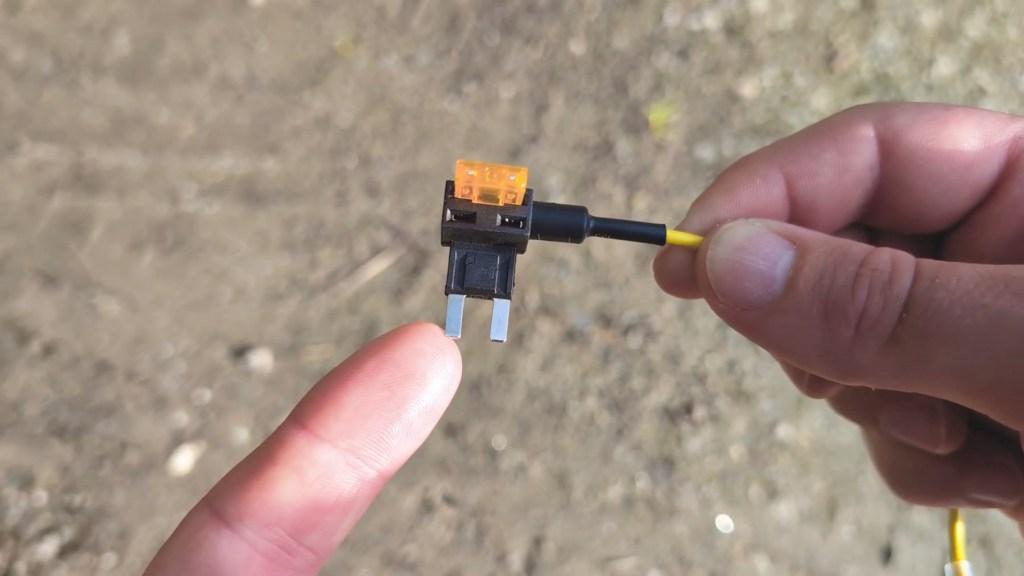

You can now place the accessory fuse you removed from the vehicle into the red ACC fuse tap, and the constant battery fuse into the yellow B+ tap. Make sure they’re seated firmly for a good connection.

We’re also on Instagram!
Check out yogi.the.van to keep up-to-date with all our adventures in the van!


Step 3 & 4 – Tapping the fuse
It’s now time to insert the taps into the vehicle and, with the hardwiring kit to hand and the keys out of the ignition, connect the red tap with the red wire and do the same with the yellow. All the fuse taps I’ve come across have nice male to female connectors, which creates a firm connection and can sometimes require crimping or pressing them together to create a lasting connection.
Protecting the connection is also important and your taps will likely have plastic sheaths or built-in covers such as I have here, though some require using a heat gun to shrink the plastic tubing to create a seal around the connectors. Ultimately you don’t want any metal exposed or to be able to become exposed in the future.
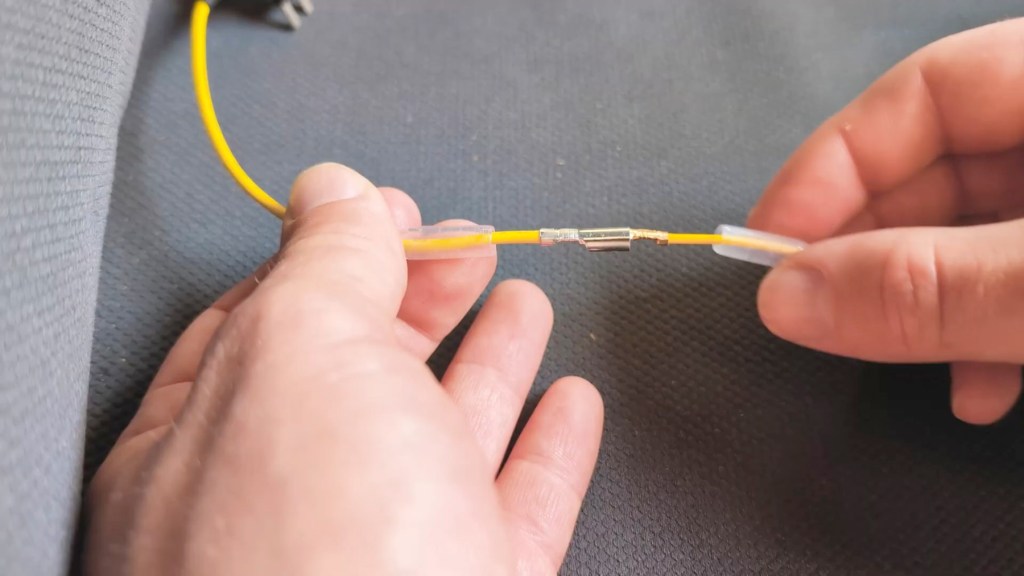

Be sure to refer to the instructions of your device to find out whether they recommend crimping the connections or the use of heat. Here there are plastic sheaths to protect the connectors, and I found the best way to do this was layer one over the other.
The Atoto user guide doesn’t say anything about using a heat gun to shrink them together, which is sometimes the case for other hardwire kits so I haven’t done this here, but I feel happy with the level of protection provided by the plastic tubing.
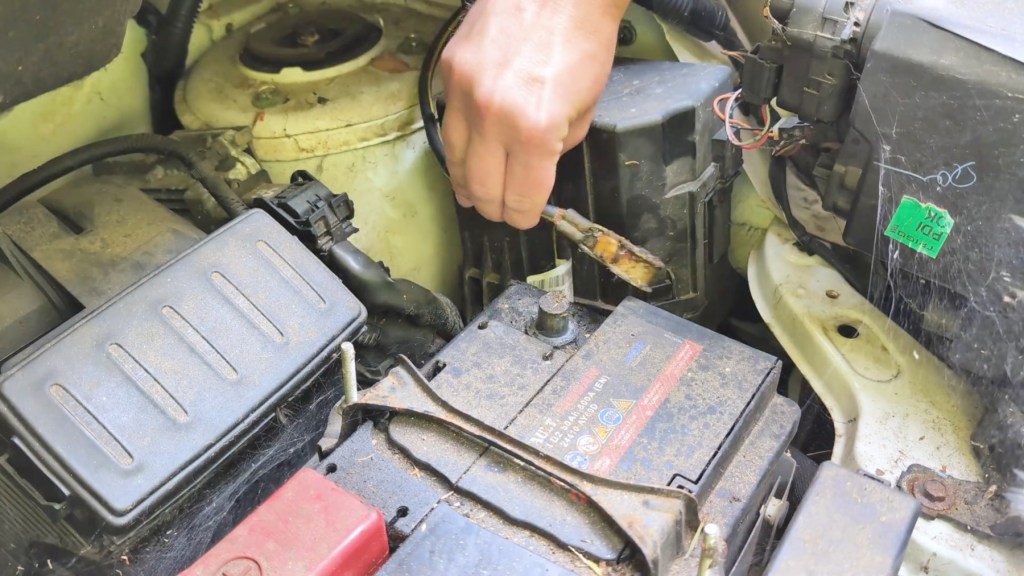
Before inserting the fuse taps into the vehicle, Atoto recommends disconnecting the negative terminal of the battery which I did here, however if you do this too you’ll be resetting your stereo so will require a radio code when reconnected, which is often found in your car manual but worth checking out before you disconnect the battery.
Ensure that your fuse taps are up the correct way you determined earlier and insert them into the slots.


You may notice on my yellow B+ tap that I don’t have a vehicle fuse inserted and that I’m inserting it into an empty slot. My only constant battery fuse was in too difficult a position because of the right angle of the fuse tap. As a result I resorted to an empty slot which worked absolutely fine.
Again, make sure this is in the right orientation and, as you can see from my vehicle, the red and yellow fuse taps are facing different directions, so there isn’t always a set way they should be inserted.
Click to buy your own…


(Affiliate links which help support this blog)
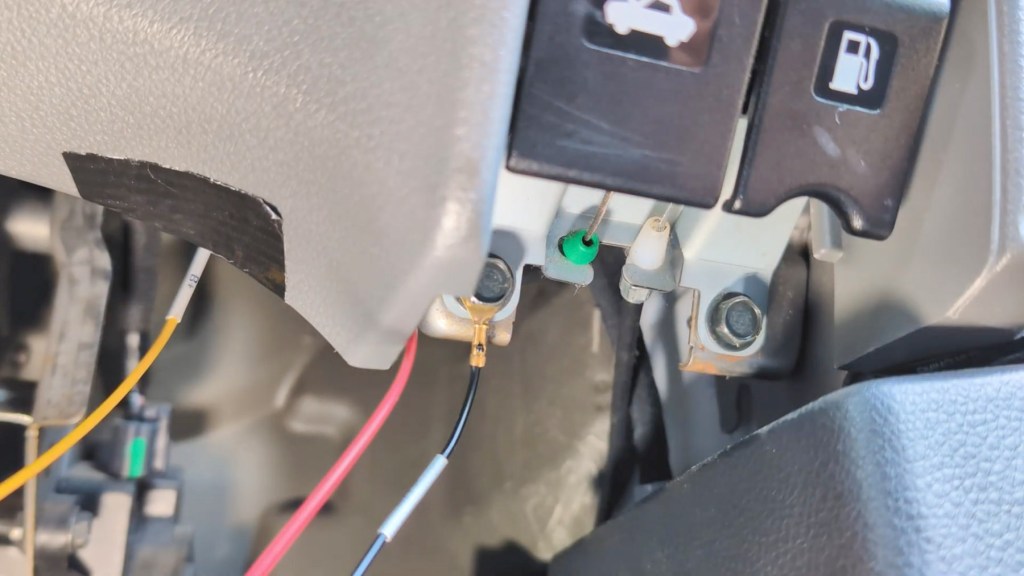
Up to this point we’ve neglected the third wire coming off the hard wiring kit and that’s the black ground wire. This needs to be slid under a grounded bolt and I’ve found one just below the fuse box here, so I can tighten that in place.

Once the device is grounded the circuit is complete so, if done correctly the device will start when you turn the ignition on.


If your device requires you to connect to a constant battery fuse double check that it’s got a built-in sleep mode or minimum voltage limiter like the Atoto console does otherwise you’ll eventually have a flat battery.
Tidying the Wires
With the four steps to tapping a fuse complete, there’s one final thing you could do to finish the job which is rooting the wires to your device in the car trim to hide them.
This can be done by popping off bits of the dashboard using trim removal tool set which won’t damage your vehicle in the description below.

How you get the trim off differs for every vehicle and depends on where you want to root your wires to, but it’s doable for most and is a great way to get a clutter-free dashboard.
Final thoughts on how to hardwire a device into your vehicle
So that’s a brief overview of the steps to tapping a fuse in your car and hopefully you’ll
agree it’s not too difficult a job and is worth the effort.
If you’ve got any questions do drop below and I’ll do my best to answer them and don’t forget I’ve got links to everything you might need in the description if you want to get them for yourself, including the Atoto screens which really are some of the highest quality ones I’ve come across.
Thanks for stopping by!
Click to buy your own…


(Affiliate links which help support this blog)

)