
This article is a written account of a video from the Lens Of James YouTube channel. Watch the video above and subscribe if you like what you see!
This article contains affiliate links to relevant products I have used in my videos. By buying through these links, I receive a small percentage of the sale at no cost to you which helps me support and grow my website and YouTube channel, so I can create more content like this in the future. Thank you for your support.
In this blog I’m going to be doing something a little different, and that is…answering, replying, responding to some of the many questions I’ve had in the comments about my van build.
Since I started releasing my van build videos I’ve received over a thousand comments, and so the ones I’m answering here are inevitably ones which pop up a lot. If you’d like to see any of these videos, then I’ve linked my whole van build playlist HERE.
So I’ll run through comments in the order I did the van conversion, and then answer other ones which don’t quite fall into those categories afterwards, so stick around for those.
Let’s get started…
Insulating the van
Hi, was the van much quieter after doing a van conversion?
Yes, but it’s only a small van and I never really got the panel boom you’d get with the Sprinter vans and the much larger vans.
But the insulation definitely dampens the sound a bit. I noticed it especially in the doors; once they were filled with the recycled plastic bottle insulation, they had quite nice thud to them as opposed to being tinny, so definitely an improvement there.
Couldn’t you use expanding foam in the doors?
Quite possibly. There are definitely some industrial methods for spray foaming the entirety of a van (closed cell spray foam) and I’m sure it gives incredible insulation properties. But I think for these doors it would have been very messy. And you’d have to be careful with the door mechanism as well – I wouldn’t want to completely fill that in, but I’ve been very happy with the mixture of foil bubble wrap and recycled plastic insulation I put in the doors here.
Can you tell me why you didn’t cover the roof beams with silver foil?
There’s a really good reason for this, I used expanding foam in the roof beams and then carpeted over them. Before I’d insulated, I’d slept in the van a number of times and had some really damp mornings as well, where lots of the van inside was condensated on the bare metal and those bits simply weren’t condensated, so I didn’t see any need to put any silver foil on them.
Once the expanding foam was in there, that would be adequate. The carpet over the top does a brilliant job and there’s no condensation on them now.

Where did you source your reflective insulation and carpet, and what types are they please?
So I’ve already mentioned them briefly, but there’s foil bubble wrap insulation, the recycled plastic bottle insulation and four way stretch automotive carpet. The colour of the carpet smoke grey, the brand of the foil insulation is Thermawrap, though there are lots of others which I’m sure would do an equally good job, and the recycled plastic bottle insulation is from Diall, which is a B&Q brand.
Carpeting The Van
What is your wall covering? Felt?
It’s the four way stretch automotive carpet in smoke grey. It’s available widely online, but it does look a lot more like felt than it does carpet. It’s very stretchy, really easy to work with and great for getting around all the contours of the van.

Is there a reason you choose carpet? Does it help with insulation and sound noise?
&
Can you tell me why you used carpet rather than ply?
So for the first question, carpet really helps with both. It helps with insulation and sound deadening to an extent but it’s definitely not the best insulator, though it reduces some condensation. To answer the first and second question, wood can be quite heavy, so depending on the thickness apply you use, it can add some weight and fuel cost to your van there. Also, I really like how it looks round the contours of the van, it’s quite soft to touch as well. It also hides marks and saves you a bit of space as well by carpeting because you don’t cover up all the contours and the cavities with the ply.
Can you tell me how much carpet you used?
&
How many square metres of carpet were used?
It was about 5m for the walls all together, 2.5m for each side, not including the doors, and I used an extra 4m, about 1m per door.
They didn’t have to be quite as long and that was 1.4m to get from the top of the door to the bottom of the door, whereas I needed 2m lengths to get from the ceiling down to the floor when doing the walls of the van. In total, I spent about £75 on the carpet.
You had any dramas with condensation carpeting directly onto the metal?
No I haven’t had any issues. The contact adhesive‘s holding strong and there’s no condensation to speak of. Nothing’s peeling off either, so the carpet’s definitely been a benefit to the van in terms of waking up in the morning and finding the walls soaking wet; well that doesn’t happen anymore.
Is it possible to remove the carpets if you want to sell your camper van as a van in the future?
Possibly, but it would be a huge amount of effort and a lot of solvent to get rid of the high temperature contact adhesive as well. I think the carpet would probably rip off if you put a bit of elbow grease in, but the glue would be a nightmare to get off and it was one of the things I had to really commit to with the van as being a permanent feature and just realising that I wasn’t going to take it off.
The van ceiling
How did you attach the ceiling?
I used very small metal screws (eBay affiliate link) to go through the very thin ply. It’s a very light ceiling and they just go into a little ridge on the roof beams. I’ve had to take them down a couple of times, to insulate under and to varnish the boards, and then they always go back up without a problem.
Carpeting the van doors
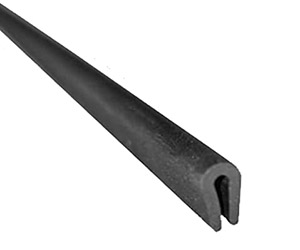
How is the rubber trim, the adhesive, the bond holding up?
So the rubber is holding up really well. I made one change and that was to the back doors. The inside door handle was knocking the rubber a little bit, so I pulled that off and instead of using the Geocel marine silicone rubber sealant, I used medium viscosity cyanoacrylate superglue just to test it out and it worked really well as an alternative option to the silicone adhesive, which is quite messy and took quite a long time.

Click to buy your own…


(Affiliate links which help support this website)
What if the door latch fails because you carpeted over the opening?
Well, I’d just remove the door card, cut through the carpet and insulation, fix whatever wasn’t broken, patch it up and replace the door card, so not much trouble.
We’re also on Instagram!
Check out yogi.the.van to keep up-to-date with all our adventures in the van!


Just wondering why you didn’t just cut some ply panels, carpet them and then attach them to the doors?
&
Why did you choose this method over a ply door card?
I’m sure it would have looked neat; carpeting some ply, attach it to the walls and to the doors, but I want to give myself a challenge. I really like the look of the rubber edge and it also creates a rubber seal to keep water out. The water just drips down the rubber edge and away from the carpet. Also, the ply would have been directly screwed into the doors, and I wanted to minimise, as much as possible, the amount I was screwing into the metal of the van. It can promote rust, especially on a door which is open and can be exposed to the rain. So I carpeted around the contours of the door, did the rubber seal, and been really happy with it.
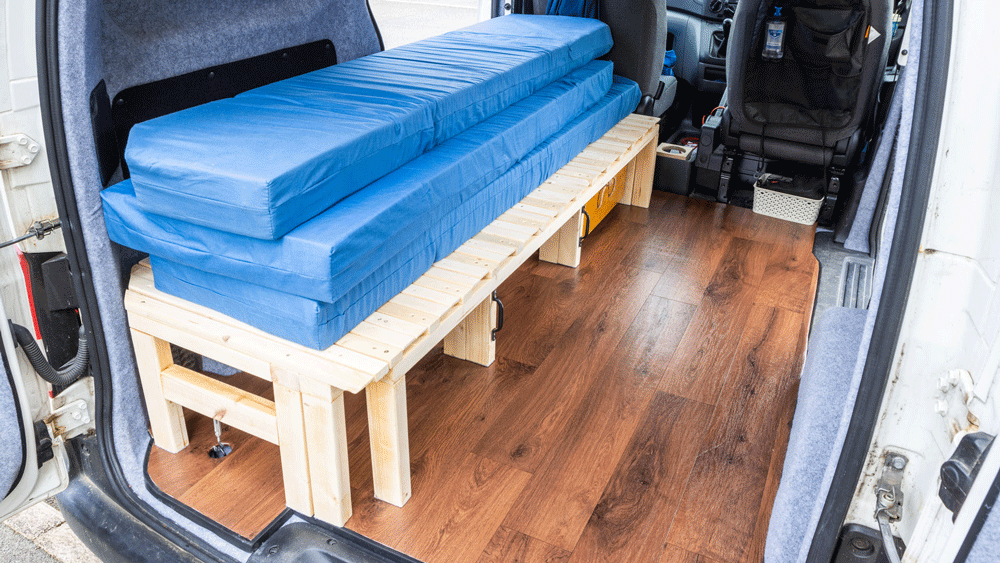
The 3 section pullout bench/bed
What are the dimensions of your 3 section pullout bench-bed?
So, the bed is 183cm long, it’s 56cm wide when fully in and 150cm wide when fully out.
How do you find the NV for sleeping space wise with the two of you?
Really good – a king size bed is just lovely. It’s very comfy and the mattresses are great. And yeah, we have a great time camping – a very comfortable night’s sleep.
Do you remember how long this took you to build?
I did it in two stages – the frames and legs (not including the draw) and then the slats. If I added up the time I think it was about 2 days work all in all, but that doesn’t include the planning because I hadn’t seen another 3 section pullout van bed to work off.
Just buy a basic sofa bed from IKEA. Done.
Haha, not as easy as that unfortunately. The NV200 is only really long enough to sleep in if you work with the awkward corners at the back, so it had to be a custom bed. Plus I needed to keep the centre free, so a 3 section bed it had to be!
The van floor
Why didn’t you leave fuel pump access in the floor?
I choose to cover the fuel pump cover for a few reasons. The first is that it’s on the side that I access the van, so a break in the vinyl wood effect floor (eBay affiliate link) would soon attract dirt, get scuffed. Also, everything’s removable, only take a few minutes. Plus I’ve never needed to access it, and I understand you can access it from underneath if necessary, though don’t quote me on that. Hopefully I never need to access it!

Next are the window covers, and these definitely cause some debate, normally based on how they will be used. So I’ll start by saying that I use mine to cover the windows at night, so people can’t see in, and to try to reduce a bit of the condensation at night and reflect the sun and keep the van cool in the summer. Painting the silver side black might be ‘stealth’ but that’s not what I’m trying to achieve, though if it works for you, great!
Thermal Window Covers
What kind is that silver foil?
It’s Thermawrap foil bubblewrap insulation
Have you used these blinds in winter yet? I’m interested to know if you think they kept the cold out, the warm in?
&
Isn’t it better if the thermal layer is on the inside, so body heat can bounce on it, rather than it pointing towards outside, at least for cold weather?
I haven’t used them in winter, as I don’t camp in winter. The van isn’t set up for that. There’s a misconception that they’ll magically warm up the van up – they won’t, but will help keep the sun about and reduce condensation a little.

I always factor in how much time something will take me and how much do I earn an hour, so I don’t think I will be attempting to do this – I will instead just buy some.
That’s totally fair enough, I had the hugh benefit of making these at home during lockdown, so time was one thing I had plenty of!
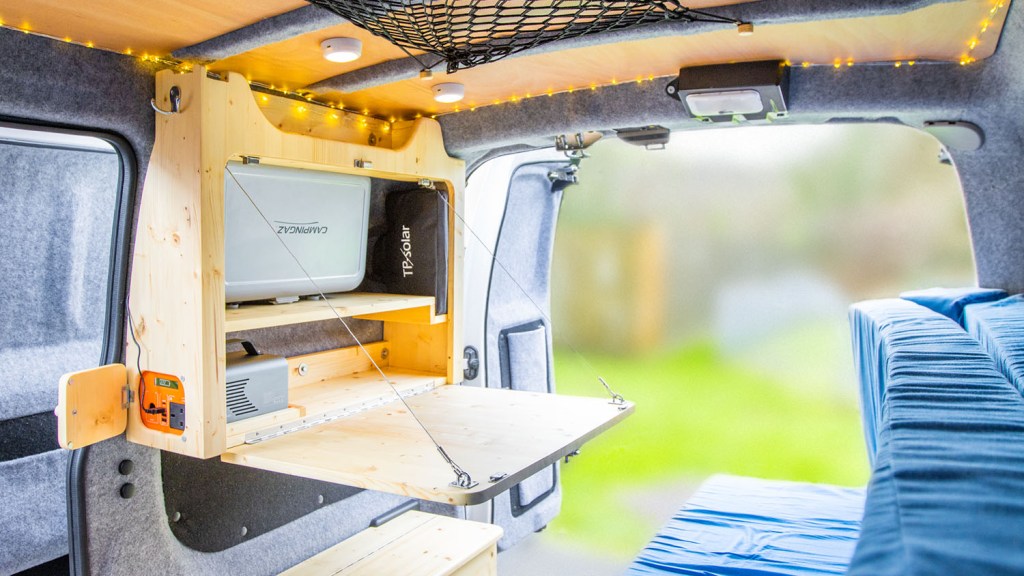
Van electrics, refrigeration & lighting
How did you do the electrics?
My electrics are very simple. A big battery pack, a foldable solar panel and, hopefully, an electric hook-up when camping. The LED lights are USB chargeable, and not wired in through the ceiling boards.

Click to buy your own…

(Affiliate links which help support this website)
I looked at that cooler but it seems VERY close to the handbrake??
It is, but I’ve never had any issues with the proximity. And I don’t have the cooler in the van very often – only when camping.
Van furniture
Where do you screw the whole structure to the van? Do you screw on the metal of the van?
I’ve tried to keep my van build as removable as possible, so all the furniture attached either with turnbuckles, as with the bed and storage chest, or bolts (eBay affiliate link) into existing screw threads built into the van, as with the table. That way I haven’t had to screw directly into the van metal, which could promote rust.
I wanted to know how you matched the shelf to the contour of the van so perfectly?
So first, it’s far from perfect, but I made a template with scrap cardboard first, and the cut the wood from the templates.
Wasted time/effort/material on the table when a single piece of birch plywood cut to size does the job.
So I completely understand that having one big bit of ply could be easier but there are a few reasons I couldn’t do it this way.
First, a sheet of ply is difficult to transport in a small van, then the pineboard can be bought in a number of sizes that suited my project (meaning less cuts to make and less wastage),
The ply is also lighter than quality plywood (important for a van build), and was easy to source for me (unlike quality ply which is difficult where I live). I’ve done a ‘single piece of ply table’ (see my earlier video) and it looked basic.
Van build cost and other questions
How much did it cost?
I’ve totalled it all up and done a video on this now, check it out HERE if you’re interested!
Ventilation
Everyone goes on at me for not having a vent in my van, but as we only camp in it for under 30 days a year, I really haven’t found one to be necessary. Plus a vent might require power, so I’d have to introduce a leisure battery to the van.
I just crack both windows a little, and thanks to the wind deflectors, no rain comes in, though a nice flow of air does.
That said, if I lived or camped overnight in the van more often, I would definitely consider a roof vent. Maybe one of the snazzy electric ones with a remote control.
Are u going to fit a diesel heater in the nv?
No, for the same reason as the ventilation – given our low overnight usage of the van, I don’t feel it’s necessary or worth the extra expense. I’m sure it’s a nice addition to a van build though!
What is the coldest climate you use the van in?
Every van build should be built around the temperature conditions of where you intend to use it, and luckily for me I live in an area of England which doesn’t get too hot in summer or too cold in winter, and rarely below freezing. I would have used different insulation and definitely added heating if I was regularly using it in cold conditions.
Things are missing from the van
People tend to think I’ve missed things out of my van build, but the reality is that I’ve intentionally not included them. As I said earlier, I don’t want heating or a vent, and haven’t missed them in nearly 2 years of using the van as a camper. For me, simple is better, and if I’m camping then I’ve probably got facilities at a campsite which is more convenient than cramming them in a tiny van.
Where is your toilet and its setup and how do you do your shower?
I’m not sure whether this person realises that the rear space of my van is about 2×1.5m, but neither a toilet or shower were ever going to make it into my van build. Also, I don’t live in the van. Both of these things would be severely under-used, and would be taking up vital space. Though if I lived out of a bigger van I would definitely consider these!
—
To finish, I really love my van and the conversion that it holds. It’s great to drive and it also helps, to answer the final question, that it gets about 50 miles per gallon, and that’s a UK gallon, making it pretty fuel efficient.
I hoped you enjoyed the video. If you’ve get any more questions about my van build, or something van-related – or not van-related at all – that you’d like answered in the future, leave them in the comments below and maybe I’ll answer more questions in the future.
If you want to see more of my camper van build in action, please CLICK HERE.
(Affiliate links which help support this website)
